Hello Future Friendly Gardeners. Jared, our founder and CEO, was on the Garden America radio show this past Saturday morning discussing a bit of the history and benefits of Native Soil.
You may not know it, but Jared is actually originally from the East Coast. At Upcycle, we don’t hold that against him. Well, not that much anyway.
The genesis for Upcycle and Native Soil came from when Jared went surfing after a storm here in San Diego. Locals know that the run off from the city and from the Tijuana River Valley creates a virtual bacteria laden soup very near the shoreline. In short, locals don’t go surfing after a storm. Jared didn’t know that and saw a deserted break as a great opportunity.
Then he got sick.
That downtime during his illness was all it took to get passionately involved with water cleanliness and wastewater issues in general. Through that experience, the individual waste products that would come together to form the Native Soil all purpose blend were discovered.
If you’d like to learn more about Native Soil, spend 15 minutes hearing about it direct from the horse’s mouth. While you’re listening, head over to our coupon site and grab your discount for Native Soil on Amazon Prime.
While Upcycle and Company creates sustainably sourced fertilizer from upcycled waste that is dynamite, we know it isn’t the only piece to the puzzle. One of the most popular vegetables to grow in any backyard or patio garden is the humble, yet versatile, tomato. With its lycopene density, not only is it one of the easiest plants to start with, it is also extremely healthy. As a vining plant, it needs more direction than a toddler, so garden infrastructure is an important part of garden planning.
Garden Infrastructure
The guys over at Grow It Now Garden Products have some of the easiest to implement garden infrastructure that we have seen. This is obviously a step or two above building your own raised garden bed in an hour. While we support the DIY ethic, we also understand it isn’t for everyone.
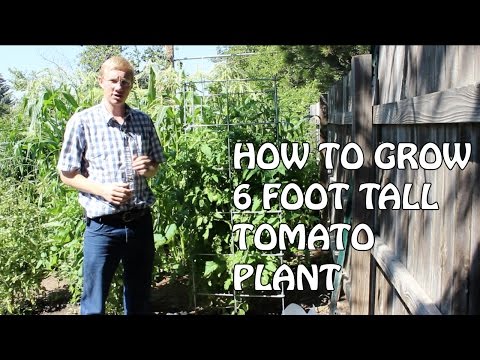
If growing is really your ultimate goal outcome, you might consider ordering a prefabricated kit. Watch the video below to learn how to grow a six foot tomato plant using the right technique. Native Soil Fertilizer is essentially the afterburner in this engine. While we are focused primarily on tomatoes here, a more comprehensive infrastructure plan might be the next step.
How to Get Started
Hello this is Russel Smith with Grow it Now Garden Products. I am here with you today in my backyard garden to talk about how to grow a six foot tall tomato plant. In one of my previous episodes I planted this tomato plant. What I did was I buried it deep. I dug a hole about two feet deep. I buried my tomato plant in there so that only about six inches was sticking up out of the ground. And then I put an eleven inch miniature greenhouse over that. Staked it down. And then I put the eighteen inch miniature greenhouse over that.
Add a Little Sun
What those do is they add heat to the plant so it stimulates plant growth. And since I’ve done that video and shared it with the gardening community I have had a lot of questions come back and the questions are what do I do with the plant when it grows out of the eleven inch miniature greenhouse? Do I take both of them off? And the answer to that is no. Only take the eleven inch miniature greenhouse off and then leave the eighteen inch miniature greenhouse over top of it, until it grows out of the eighteen inch miniature greenhouse.
In this case, that was as far as I went. On some of my other tomato plants I actually went to a thirty-six inch miniature greenhouse and added even more growth and plant stimulation to the plant. In that case you are going to have to make sure you come in and shake the plant in order to get the pollination. So with this one, that was the secret sauce.
I dug the hole, buried it deep so that only six inches were sticking out of the ground, put my eleven inch miniature greenhouse over it and then the eighteen inch miniature greenhouse over that. Since that video I have also had the question well what do you do for fertilizer? So here’s my secret to fertilizing. Since I’m getting in the ground early, I’m planting my tomatoes early and I’m trying to push the season with the miniature greenhouses.
I like to prepare my garden in the fall for spring planting. So what I’ll do every fall is I put four to six inches of cow manure overtop of the garden and then I till it in really deep. So that is one of the things that I use to fertilize.
#NOrganic Fertilizer
[Editor’s Note] This next section Russel discusses the fertilizer blends he used to achieve this result. Native Soil is an off the shelf fertilizer that meets these criteria. We firmly believe that our sustainably sourced blend is better than “certified organic.” Our future friendly fertilizer blend is as important as any physical garden infrastructure.
The other thing I use to fertilize is I’ll use a dilute solution of fertilizer. Off the shelf fertilizer. So that is a nonorganic way, and then I mix it with other organic fertilizers. So I experiment both ways. If you are a new gardener I would recommend starting out with an off the shelf all-purpose fertilizer and then weaning yourself off of that to a more organic fertilizer. So on this six foot tall tomato plant you can see I have a lot of tomatoes growing. I probably have fifty or so tomatoes on this plant, just going like crazy. And the other thing is that you can see the stems on these up high. Look how thick that stem is.
It is about one inch thick. Down low there is only one stem coming out of the ground and that is feeding off of a massive root base in order to support this whole tomato plant. So tip and trick, burry it deep, put the eleven inch miniature greenhouse overtop of it, eighteen inch overtop of that..
I’m not sure if you’ve noticed, but the Sun is going to set slightly earlier and the heat index is climbing steadily here in San Diego. As of the date of this publishing, California isn’t currently in a drought, but that doesn’t mean that conserving water, especially in our garden landscaping isn’t important. Saving water in all contexts is important. Vegetable gardens require a fair amount of water to ensure that the plants grow up healthy and happy. Here are some of our favorite tips for how to protect and water your vegetable garden for summer heat.
This one is kind of a no-brainer but if you can get the water on the ground earlier, it has more time to absorb and takes longer to evaporate. Not to mention the plants can absorb more water if there is more water available. You want nice big juicy vegetables coming off your plants, so set an early alarm or a water timer and set it for early in the morning, preferably before dawn. If you’re using Native Soil, and I hope you are, you can use less water in general as Native Soil features high water soluble nutrient density. This means less water gives the plants more nutrients than comparable fertilizers.
The big leafy plants are usually the first to show signs of dehydration and other forms of distress from the heat. The broad leaves use a lot of water and more moisture is sucked out of the larger surface area. Keep a close eye on your squashes, your lettuces, and your cucumbers to find the plants that are really feeling the stress. Water your vegetable garden for summer heat the minute you see those big leaves start to wilt. That will help you dial in the proper schedule and time of day to deploy your watering.
Water Your Vegetable Garden for Summer Heat Less Frequently
This point is more about conservation so you’ll have to play around a bit to find the most useful frequency to water your vegetable garden in the heat. In most parts of San Diego, even in the summer, a heat wave doesn’t last too long and the coastal microclimates are still pretty mild. In this case, watering twice a week may be sufficient if you’re watering at the right time of day. On the other hand, if you’re in the inland valley areas of the east county, the summer heat can be both consistent and brutal. Even if you have all of your other tips and tricks employed, you may find yourself needing to water four times during the week.
Use Raised Garden Beds
Using raised garden beds aren’t just for areas with limited space and one of the great balcony garden ideas. They are also easier to saturate with water as the volume is finite. You’re not going to find random grasses, weeds, and trees leeching that precious water from your heat stressed garden. Here’s a pro-tip, combine the use of hay bails with a cheap raised garden bed. Straw is extremely water absorbent. In fact, farmers have to worry about their hay bail stacks getting wet as the chemical reaction is sufficient to heat the hay to the point of combustion. You’re not going to have it packed in that tightly, but we highly recommend growing in straw. Check out our article on building cheap raised garden beds to restructure your garden to be as resistant as possible.
At Upcycle we hope you’re able to find the right way to water your vegetable garden for summer heat. It’s a bit of a tricky learning curve, so err on too much water to start and keep an eye on those big leafy plants. There’s nothing like a backyard barbecue featuring your own home grown produce. Find your soil mate.
One aspect of living and working in San Diego is the ability to grow basically anything year round. We don’t really have “garden seasons” like the pour souls in other parts of the country. Our Mediterranean climate means not having to worry about little worries like frost, snow, tundra… you get the point. Even so, if you want a great garden, you need to be a master garden planner.
Just because you can grow anything at anytime doesn’t automatically mean that you should. Planning a garden is half the battle, so knowing what you want to grow and when can be a somewhat daunting task.
Garden Planner to the Rescue
We came across a great app to help out in that arena. It’s called Garden Time Planner and it will walk you through the process of growing whatever you want and give you a pretty accurate estimate of when what you’re growing will be mature.
It is region specific, so even if you’re not in California and are blessed by a mild climate, you can really dial your garden in. Terrible weather is not an excuse not to grow.
The app is made by the Burpee company, so you know it is going to be made specifically for gardeners. Burpee has had gardeners backs from all the way back in the late 19th century. They’re synonymous with home gardens.
As you can see, the app is easy to use and really provides the specific data to ensure that your grow is going to be a hit. Aren’t smartphones wonderful?
Alternatives to Garden Planner
If smart phones and apps aren’t your style there’s nothing wrong with going analog. A simple day planner will allow you to chart your garden progress and growing timelines. There are several day planners and journals that will help you to track your growing season.
I particularly like the vegetable gardeners handbook. Its light and simple, straight forward and to the point with tons of practical advice.
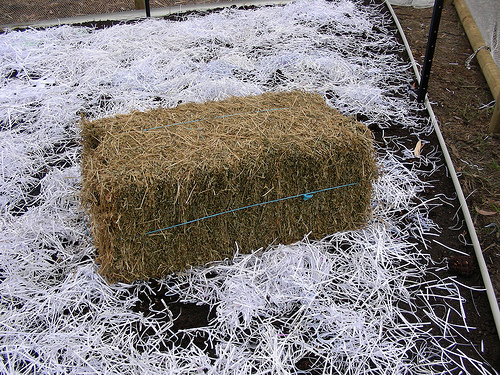
We’ve been pretty adamant at Upcycle and Company that just about anyone can be a gardener. One of the most common objections we hear from people who would love to grow their own food, but they’re convinced they don’t have space. No outside yard means no growth in their minds. Well, they couldn’t be further from the truth. How about a hay bale garden? We posted a link on Facebook this last week that shows how anything can be grown at home in hay bales.
Gardens can be planted anywhere. Even on concrete balconies or driveways.
The idea behind straw bale gardening is simple. Plants grow in the top of the straw, which begins decomposing as soon as it gets wet. As the straw breaks down, it turns into a rich, compostable planter that’s ideal for growing vegetables.
The advantage of straw bale gardening is that you can set the bales anywhere where it’s sunny, as long as you can keep it watered. poor soil? it doesn’t matter. you can even set the straw bales on a concrete driveway.
the first step – get a bale of straw. you can find them at most garden centers and feed stores for under ten-dollars.
Sounds like a pretty good deal. At Upcycle, we created #NativeSoil to help those without appropriate growing conditions to get out there and do some practical growing.
Prep Your Hay Bale Garden
Prepping the hay bale is a two-week process, so make sure you plan ahead. Step 1, thoroughly wet down the hay bale. From gardeners.com:
The first week
Water the bale thoroughly, until water runs out the bottom of the bale. Sprinkle the surface with a nitrogen source (see box), applying at the recommended rate.
Every other day, add more of the nitrogen source; water thoroughly. Do it a total of three times during the first week.
On the days you don’t apply nitrogen, just water the bales thoroughly.
The second week
For the next three days, apply the nitrogen source daily at half the original rate. Follow up with thorough watering.
After three days of adding nitrogen, water daily.
The last step is to add a well balanced all around fertilizer like #NativeSoil. Since Native Soil is a slow release powdered fertilizer, the nutrients are available immediately and released slowly over the growing season. This allows you to have a one and done fertilizing philosophy. Once the hay bales begin to decay from the inside, they will begin to heat up. In roughly a week, you’re looking for an internal temperature of 75 – 80F.
At that time, the bed is primed and ready to receive your vegetable starts.
Don’t ever let anyone tell you that your concrete slab isn’t a great place to grow some tasty vegetables. When you’re growing in small spaces, you have to sometimes think outside the box.
The best part though? No weeds and you don’t even have to get your hands dirty.
Watch KTVB’s coverage of this hay bale garden phenomenon.
Gardening isn’t just fun; it also has many practical benefits. Whether veggies or flowers are your passion, the very act of creating a garden is immensely rewarding. Adding seasonal gardening to the mix will keep give you a reason to keep in your mind in harmony with the seasonal changes. It can even help with conditions like seasonal affect disorder (SAD). The information below provides a little advice and a few pointers when it comes to both your garden, and the act of growing.
Attune to Seasonal Gardening
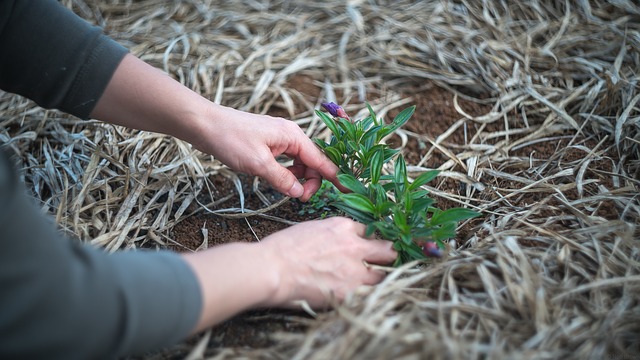
Your plants will respond better to gradual changes of environment. Not that we have a tremendous amount of seasonal change in San Diego, but there are certainly some nuances to follow. Put the plants outside in the sun for one to two hours in the beginning. Throughout the week, you should leave your plants out for a little longer each day. By the weekend, the plants can make that big move without a problem!
Starting seedlings in pots before planting in your garden is a smart idea. This increases the chance that your plants will survive to adulthood. This method also gives you the freedom of tightening time periods between each planting. After you remove the mature plants from your garden, you can immediately replace them with the seedlings and start the cycle over again.
Start with the Basics
The first thing you can do to avoid pests is to start with healthy soil in your garden. Healthier plants are greater in strength and resistance to illness and insects. For the most vigorous and healthy plants, start with high-quality soil, and stay away from chemicals. These can accumulate salts over time. A product like Native Soil helps to balance out otherwise spent soil. Nutrient rich soil makes seasonal gardening easier in that it improves your chances of successful growth immensely.
Use biennials and annuals to beautify your flower beds. By utilizing quick-growing biennials and annuals, not only will you be brightening up your flower bed, you can also alter its look each season and each year. Use them to fill gaps between shrubs and perennials in the sun. The most popular varieties to use include petunia, zinnia, cosmos, snapdragon, marigold, hollyhock, and sunflower.
Plant vines like ivy to cover fences and dividing walls. Plants that climb are extraordinarily versatile, and can help hide an unsightly wall or fence, usually within one season. They may grow up through some existing shrubs and trees, and can even be worked to grow around an arbor. Some climbers you plant will have to be tied off and supported, but others have no problem attaching themselves to any surface using their tendrils or twining stems Some of these plants include, wisteria, jasmine, climbing roses, clematis, honeysuckle! I love the smell of night blooming jasmine in the summer time with a nice glass of lemon water on the patio.
To achieve the best growing results, plants need sufficient carbon dioxide. A high level of CO2 provides an optimum environment for growth. A greenhouse can concentrate the levels of CO2. When it is exposed to high carbon dioxide levels, a plant has the best growing condition possible.
Stick with it. Make Seasonal Gardening a Lasting Habit
Whether you have been gardening for a few days or a few decades, you must never deviate from the instructions on the labeling of all implements and chemicals. If you miss this easy step, you run the risk of harming yourself due to the chemicals that can irritate your skin. Keep your health intact and follow the directions to the letter.
Gardening is a very interesting and rewarding activity. The fruits of your time and labors fail to stop yielding, regardless of the dividends are vibrant color outside your windows or fresh foods on your kitchen table. By assimilating what you learned about gardening into your routine, you can enjoy gardening and all it has to offer.
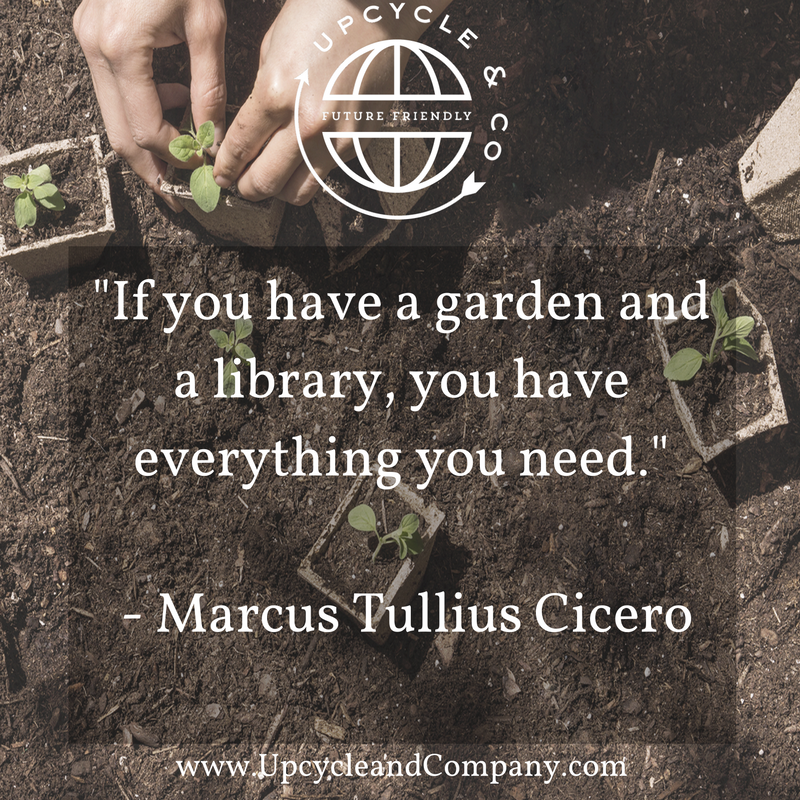
“If you have a garden and a library, you have everything you need.” – Marcus Tullius Cicero
Seems simple enough right? Sometimes life can become too complicated, so over complex that it becomes necessary to pare down to the basics. A garden and a good book. We can get on board with that sentiment. Sage wisdom from the ages.
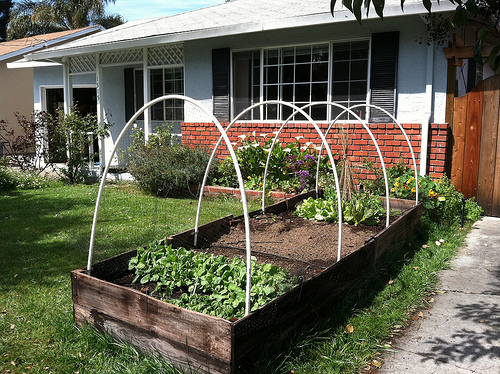
As we like to say here at Upcycle, getting the soil chemistry right is the bedrock of gardening success. If the plants can’t get the right nutrients, there’s no way you’re going to get a healthy result. The problem is that not all soil is created equal. Here in San Diego we have massive amounts of clay and decomposed granite that can be very difficult to grow in. Luckily any novice gardener can get around this soil problem by building a cheap raised garden bed with scrap wood in under an hour.
Where to Find Your Plans
Get familiar with the website Instructables. It is the crowd sourced repository for all sorts of do it yourself projects, including, cheap and easy raised garden beds. I’m using the term “plans” very loosely here as many of the products are built using scrap wood and materials laying around the house to keep the cost low. I particularly like this builder’s take on a family project building garden beds after tearing apart a pool deck:
My son helped me take the railing off of the deck. He liked whacking the spindles off. It appealed to his innate 9 year old destructiveness. In 100 degree weather I stripped half of the pool deck off.
Keep the costs down by using scraps. Low cost allows any gardener to focus on their plants, not their beds. In addition to creating a garden bed, you’re cleaning up the yard. With so many options, which ones must be exercised?
What Features to Focus On
There are some universal features each gardener is going to want in their cheap raised garden bed. First is to remember that you want it to be a sealed environment so that you grow what you mean to. Meaning you want to keep all the local critters out and keep them from eating your newly grown vegetables. Don’t just build a rectangle and plop down your soil. The cheap way to keep gophers and other subterranean vermin out of your bed is to use chicken wire. Lay that chicken wire across the bottom of the bed to create a barrier between your cheap raised garden bed and whatever it is sitting on.
Second, if you’re putting your raised garden bed on grass or over other raw yard soil, you need to keep a barrier there as well. This one is a little bit more complicated. Get some weed barrier fabric specifically made to keep grass and other weeds from growing up through your raised garden bed. Don’t let unwanted pests, flora or fauna, choke out your garden.
Cheap, Easy and Quick
There are a ton of cheap and easy raised garden beds you can employ. Look around your yard and take inventory of what you can use. Most of all this keeps the cost of gardening down.
Gardening is a natural process that brings the body and mind into alignment with nature. There’s something so satisfying about watching your garden bloom from the seed into maturity. The insights here can help you get going and answer a lot of questions you may have. Listed below is some very valuable advice that will help tint your thumb green, and bring you mindful gardening success.
Mindful Gardening Starts with the Seed
Starting seedlings in pots before planting in your garden is a smart idea. Once the plant is hardy enough, plant it in your garden. In addition, you can shorten the intervals between your plantings. You will have healthy seedlings that are ready to be planted when you get rid of old plants.
Stink bugs can damage your garden, especially if you garden in the fall. These destructive pests enjoy many kinds of fruit, as well as beans, peppers and tomatoes. If you do not keep them under control, the damage can be excessive, so keep an eye out for them.
When you mow your lawn, do not mow it close to the ground. By leaving your grass a little taller, you are allowing it to become stronger, as the roots grow stronger and deeper. Leaving the grass short makes it more prone to drying out, which leaves your lawn look really brown and yucky.
Start peas inside in a container, rather than planting the seeds outdoors. Seeds will always germinate much better when you first plant them indoors initially. The seedling may also be hardier, which means that they can better resist disease and attacks from pests. You will be able to transfer the seedlings outdoors after they become better established.
Your Body, and Your Garden, are Temples
If you are gardening for the first time ever, read and follow all directions and instructions that come with your chemicals and tools. If you ignore them, you can irritate your skin in most painful ways. For your own safety, take the time to read and follow the instructions.
If you have many low-growing plants in your garden, get yourself a pair of gardening knee pads. When you spend a lot of time kneeling while gardening, your knees can be very achy by the end of the day A set of quality knee pads designed for gardening can be a world of relief for your central leg joints.
Attune to the Environment
Indoor plants have been bred over time to thrive in temperatures that are characteristic of a home. Most indoor plants like to be in about 70 degree temperatures, plus or minus 5 degrees. Plants need to be in an environment that is neither too warm nor too cool for them to grow. If there are times during the year when you would prefer not to have the temperature that high, another solution you can utilize is to purchase heat lamps for your organic plants.
As your seeds sprout, they require less warmth than before. To ensure that your plants do not suffer shock, start eliminating the use of a heat source. You must also take away plastic films from your containers in order to keep the warmth and humidity out. Watch your seeds closely to find the right time to do this.
After reading this article, you should feel better about starting your mindful gardening journey. It is amazing how much you can learn, even after thinking that you were pretty knowledgeable. Hopefully the advice and tips in this article will help give you a good start in your gardening endeavors.
A huge variety of wonderful gardening resources exist. You could spend an entire day online looking for the gardening information you need. This article will give you all of the advice you need in order to get started even if you’re a newbie gardener. Continue reading in order to get this advice.
Know thy Soil
Digging in clay soil with a shovel can be very difficult. The clay isn’t easy to work with and will adhere to the shovel, which only makes the problem worse. Coat the shovel with floor or car wax, and buff it with a clean rag to make the job a lot easier. The clay easily slides off the surface while keeping the end from getting rusty.
A garden needs the right type of soil to grow properly. Consider getting a soil analysis and working on enrichment techniques for giving your garden a vibrant and healthy environment. It can avoid ruined vegetables and flowers, so check with places, such as a cooperative extension department to see where you can obtain the analysis. Products like Native Soil help balance out bad soil chemistry and are a great starting tool for newbie gardeners.
CO2 is essential for growth. A major portion of plants grow their best in an environment with a saturated level of CO2. Growing plants in a greenhouse is the best way to contain CO2 for use by your plants. If you have a greenhouse, keep CO2 levels high.
Easy Garden Hacks
Turn the handles of your garden tools into measuring rulers. You can use larger tools, like rakes, as measuring sticks. Place the handles on the floor, then set a measuring tape alongside them. Label the distances on the handle with a marker pen that will not smear or fade away. Now when you go garden the next time, you’ll have a giant ruler at your command.
Don’t Let Your Hard Work Get Eaten
Using pesticides when natural solutions are available is the hallmark of a newbie gardener. Try to plan a variety of perennials that are slug-proof. Slugs and snails are voracious eaters that can destroy a plant literally overnight. These pests are especially attracted to tender sprouts and to delicate, soft leaves. Some perennials are not preferred meals for snails and slugs, especially if their foliage is hairy and tough, or tastes bad. These varieties include achillea, helleborus, heuchera, euphorbia, and campanula.
Use bulbs to ensure continuous flowers throughout the spring and summer. Most people have no trouble successfully growing bulbs, and their flowers will return each and every year. Different bulbs will bloom during different time periods. Therefore, if you select your bulbs correctly, you could have blooms in your garden for all of spring and summer.
Don’t make the newbie gardener mistake of planting too densely. Make sure air can circulate around your plants, and keep leaves moisture-free. Excess moisture creates an appealing environment for disease and parasites. A fungus is one of the most important and debilitating parasites for plants. Fungi can be controlled with fungicide sprays, but it is important to treat your area with the spray, before you see any problems.
Gardening is a popular hobby which many people find rewarding. As you learn more, you will become a better gardener. Always remember to listen to great advice. Start by applying the tips laid out here, and you will have the most beautiful garden you’ve ever seen.
One good way to have a steady supply of healthful, fresh vegetable is to develop a backyard (or anywhere) garden. It does take some time and effort, though. You also have a wide variety of seeds that you can select from. Enjoying your own healthful produce grown from the seed is extremely rewarding. The following article will provide you with advice that will help you create your dream home garden.
Start with the Soil Basics
Clay soil can be a real pain to work with as it often sticks to the end of the shovel. Coat and buff the digging end of the shovel with automobile wax to make digging easier. This will keep the soil from sticking, and prevent rusting of the tool.
In San Diego, you’re likely going to be dealing with riverbed soil, which is a great start, or decomposed granite, which is an enormous pain. Decomposed granite has awful starting soil chemistry, so boosting that with potting soil, fertilizer like Native Soil, or other soil additives is going to be essential.
Starting a garden with the best soil is a great defense mechanism against pests. The healthier the plants you grow, the more resistant they’ll be to illness, fungus, or bugs. You want to cultivate quality soil with adequate salt levels, which leads to healthy plants.
Choose the Right Plants for the Right Spaces
Use climbers if you want to cover any fences or walls. Climbing plants can cover a wall after one growing season only. They also work to cover up old, and possibly dead, vegetation. There are natural climbers, which use tendrils or stems to wrap around any given surface, while others must be tied with a string or rope. Excellent varieties include honeysuckle, wisteria, jasmine, climbing roses and clematis.
You can alleviate this problem by planting grasses that your cat will naturally gravitate towards. Offensive smells also work to repel cats and other pesky animals from eating your plants. Try putting mothballs, citrus peels, garlic and other pungent items on the topsoil.
Knee pads are absolute miracle accessories if you work in a garden with plenty of low-growing plants. When you spend a lot of time kneeling while gardening, your knees can be very achy by the end of the day A pair of good gardening knee pads can cushion your knees for more comfort.
Do you enjoy your mint leaves, but can’t stand how they dominate your garden? Stunt their growth a little by planting your mint into a garden container or large pot instead. The container can be planted in the ground, and it will still prevent the plant from dominating the garden.
Right Plants, Right Seasons for Healthful Produce at Home
If you are planning on growing peas, start them indoors before putting them outdoors in your garden. If you give them a chance to grow indoors where they are protected, they will germinate better. Give the seeds enough time to get stronger: growing indoors will make it easier for your plants to resist diseases and the pesky bugs. Once they are strong enough, you can transplant them outside.
Don’t count the fall season out. That doesn’t have to be, however. When it comes to brightly colored foliage, fall is an amazing time of year. There are a number of trees that provide exuberant displays of color, such as Dogwood, Beech and Maple. When you choose shrubbery, try hydrangea, barberry, or cotoneaster. Even in the winter you can enjoy healthful produce grown at home. Try some super foods like kale or hearty squash.
Starting an organic garden helps make your diet better, and understanding the different options for your garden can help you be even more successful. Using the information that has been provided is a great way to start an organic garden of your own.


 by dinesh_valke")


 Starting seedlings in pots before planting in your garden is a smart idea. Once the plant is hardy enough, plant it in your garden. In addition, you can shorten the intervals between your plantings. You will have healthy seedlings that are ready to be planted when you get rid of old plants.

 Some perennials are not preferred meals for snails and slugs, especially if their foliage is hairy and tough, or tastes bad. These varieties include achillea, helleborus, heuchera, euphorbia, and campanula.

