At Upcycle, we’ve been ecstatic with the #UrbanGardening movement. The idea that you have be in possession of large swaths of land in order to grow your own food is as antiquated as harvesting by hand. The biggest issue most people run into when trying to do a little urban gardening is that the soil, simply from being in an urban environment with all the pollution that entails, is such poor quality. Run off from storms, commercial flights and dense urban traffic all conspire to reduce the nutrient density in urban soil. The easiest way to get around this pollution issue is using cheap raised garden beds.
By getting the garden beds up and into their own defined space, a soil amendment like Native Soil can do wonders to heal the polluted urban soil. We’ve looked at cheap raised garden beds beforeon this blog, but I wanted to spend some time looking at how to build them for under $20.
Inexpensive Raised Bed Garden
Nothing like a little garden project to make any mother-in-law happy. This cheap raised garden bed contains roughly one cubic yard of space that can be used with potting soil or any soil that’s combined with Native Soil fertilizer.
$2.00 Raised Garden Bed?
Depending on how much you want to upcycle and reuse, a cheap raised garden bed can be had for the paltry sum of $2.00. Now, it may not look as nice as brand new treated lumber, but it will get the job done. If you’re working on a true urban guerilla grow, this may be the approach you want to take.
By using such a cheap garden bed you can live to fight another day if the garden is removed from the poached land.
Cheap Raised Garden Beds – Platic Crates
Here’s a project I absolutely love. This raised garden bed uses recycled plastic crates in lieu of lumber. By using crates, this project all but eliminates the need for tools. Depending on where you find these crates, this may be the cheapest project yet. Including the $2.00 guerilla grow.
Cinder Block Cheap Raised Garden Bed
If you can’t find crates, you can almost certainly find cinder blocks in an urban environment. The best thing about this project, aside from the cost, is that it will last. Cheap wooden raised garden beds have a tendency of being beat into submission by the elements. Not so with cinder blocks. Plenty of these beds are still around for years and years after they were first built.
Don’t get hung up on the materials you use when building your beds. Something can always be repurposed for the right job and the right environment.
San Diego may have amazing weather, great tourism, and a laid back vibe, but what it does not have is quality soil. Aside from the river bed in mission valley, the landscape here is primarily decomposed granite or clay. Not exactly the most hospitable, inviting environment to grow healthy vegetable plants. Well, any plants for that matter. What this means is that growing your vegetables in cheap raised garden beds is the most attractive prospect. Not only do cheap raised garden beds allow you to blend a specific amount of soil with a high-quality fertilizer like Native Soil, the basic rectangular beds make optimizing the square footage an easy task. Length multiplied by width.
Whoever said we’d never need geometry after high school?
In most cases building cheap raised garden beds is as easy as a few stakes and a few fence boards, but there are multiple ways to skin a cat. I’ve compiled several different video tutorials here to get you started on your own cheap raised garden beds.
Truly Cheap Raised Garden Beds
The Crafty Gemini is a woman after my own heart. In this tutorial, she shows us how to build square garden beds for under $15. When you keep the cost of your bed down, you can afford to spend more time, energy and money on making sure the growing medium, the soil, is extremely nutrient dense. One of the aspects of Native Soil that we really like is that it is extremely water soluble, meaning the nutrients are available to plants right away. With a $15 garden bed and Native Soil you could see your starts producing almost immediately.
High-Quality Raised Garden Beds
My raised garden beds were test beds; never meant to look this nice. Take the time to build relatively cheap garden beds that will stand up to the harsh weather. These beds are using higher quality lumber which means they should last several seasons at the very least.
Neighbor Friendly Garden Beds
My neighbors take extreme pride in their front yards. So much pride that they are quick to tell me when I’m creating an eye sore in my own front yard. When we’re trying to maximize our square footage available for food, I like to include the front yard. Unfortunately, my neighbors don’t always appreciate the DIY ethic I embody. Every cheap raised garden bed project is not appropriate for every yard. Not even ones with high quality treated lumber. This stone border garden achieves the desired square footage for vegetable growing and is easy on the eyes.
Get Out There and Grow
Once you find the right project for your space, get out there and grow. Send us pictures of your progress. The urban gardening movement is extremely exciting. Get out there and plant something.
Join our Email List to learn more about backyard urban vegetable gardening.
I’m not sure if you’ve noticed, but the Sun is going to set slightly earlier and the heat index is climbing steadily here in San Diego. As of the date of this publishing, California isn’t currently in a drought, but that doesn’t mean that conserving water, especially in our garden landscaping isn’t important. Saving water in all contexts is important. Vegetable gardens require a fair amount of water to ensure that the plants grow up healthy and happy. Here are some of our favorite tips for how to protect and water your vegetable garden for summer heat.
This one is kind of a no-brainer but if you can get the water on the ground earlier, it has more time to absorb and takes longer to evaporate. Not to mention the plants can absorb more water if there is more water available. You want nice big juicy vegetables coming off your plants, so set an early alarm or a water timer and set it for early in the morning, preferably before dawn. If you’re using Native Soil, and I hope you are, you can use less water in general as Native Soil features high water soluble nutrient density. This means less water gives the plants more nutrients than comparable fertilizers.
The big leafy plants are usually the first to show signs of dehydration and other forms of distress from the heat. The broad leaves use a lot of water and more moisture is sucked out of the larger surface area. Keep a close eye on your squashes, your lettuces, and your cucumbers to find the plants that are really feeling the stress. Water your vegetable garden for summer heat the minute you see those big leaves start to wilt. That will help you dial in the proper schedule and time of day to deploy your watering.
Water Your Vegetable Garden for Summer Heat Less Frequently
This point is more about conservation so you’ll have to play around a bit to find the most useful frequency to water your vegetable garden in the heat. In most parts of San Diego, even in the summer, a heat wave doesn’t last too long and the coastal microclimates are still pretty mild. In this case, watering twice a week may be sufficient if you’re watering at the right time of day. On the other hand, if you’re in the inland valley areas of the east county, the summer heat can be both consistent and brutal. Even if you have all of your other tips and tricks employed, you may find yourself needing to water four times during the week.
Use Raised Garden Beds
Using raised garden beds aren’t just for areas with limited space and one of the great balcony garden ideas. They are also easier to saturate with water as the volume is finite. You’re not going to find random grasses, weeds, and trees leeching that precious water from your heat stressed garden. Here’s a pro-tip, combine the use of hay bails with a cheap raised garden bed. Straw is extremely water absorbent. In fact, farmers have to worry about their hay bail stacks getting wet as the chemical reaction is sufficient to heat the hay to the point of combustion. You’re not going to have it packed in that tightly, but we highly recommend growing in straw. Check out our article on building cheap raised garden beds to restructure your garden to be as resistant as possible.
At Upcycle we hope you’re able to find the right way to water your vegetable garden for summer heat. It’s a bit of a tricky learning curve, so err on too much water to start and keep an eye on those big leafy plants. There’s nothing like a backyard barbecue featuring your own home grown produce. Find your soil mate.
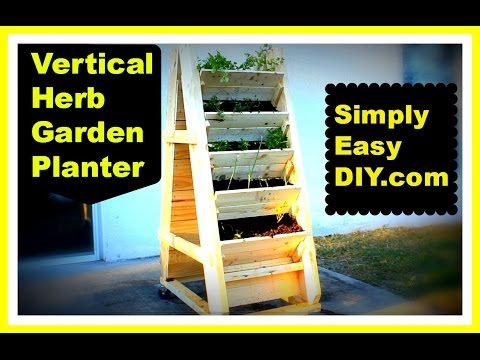
Gardening at home, growing your own food, is an extremely rewarding and almost spiritual experience. That being said, for the beginner gardener, or the gardener with little space, it can seem like a large, messy, daunting task. That’s why we at Upcycle recommend getting your hands dirty a little bit at a time. One great way to get started with something you’ll actually end up using is an herb garden. How about a vertical herb garden to save space? Relatively simple to grow, since, they’re basically weeds, herbs can be grown in a small space with basically no training. In short, if you can’t get an herb garden going, let’s start with a Chia Pet and move on from there!
The video below demonstrates how to build a DIY vertical herb garden planter. You may not have all of the woodworking skills that this video maker has, but that’s no reason why you can’t use some of the other vertical gardening ideas we’ve been enthusiastic about to create your own easy to grow herb garden. Remember, the first step to success is taking any action, so why not get started with your own vertical herb garden today?
Getting Your Own Hands Dirty
One of my passions in life is woodworking. I think probably because it fulfills that caveman instinct that I have, and a lot of men have, to provide for their families. Often times projects that I take on in the workshop fulfill a need that we have in the house. But there is something else that has quickly become a passion of mine as well. Gardening. And probably for a lot of the same reasons as woodworking. It feels good to be able to put a dinner on the table where most of the ingredients came from here, the backyard. But, like for many people our space for growing food is limited. So recently I have tried to look for ways to get more out of the space that we do have. And I figure, a vertical herb garden would be a good way to do that.
Choose Materials Wisely
When you think of materials for any outdoor project, probably the first thing that comes to mind is cedar. And why not, its rot resistant properties are well known. With that said I’ve chosen some scrap pine left over from previous projects. I’ll cut four pieces with a fifteen degree angle for the legs to start. Yes, untreated wood will decompose over time, even cedar. However, wooden planters built out of untreated wood, will probably last a lot longer than you think. I’ll mark out every nine and a half inches or so on both sides of all four legs. I’ll need twenty cleats about five inches each. I off set the marks on each side of the legs by about an inch and a half, to give me the angles that I need for the shelves. I am not using any glue in the planter portion of this project. Over the years as different parts wear out, I want to be able to easily replace pieces of the planter. Now that the legs are done, I need some back slats. For my dimensions I’ll need about 14 board feet.
A Great Weekend Project
I already have one of the planter boxes done. So for the second one I’ll place the sides on top of each other to make sure the widths match after I’m done putting the back slats on. Tack them with brads just to hold them in place. Check for square. Tack the other side. Drill pilot holes Screw them in place. I’m going to flip each box on their sides and place a board across the bottom to mimic the ground so I can get the angle right. Cut some leg braces on the miter saw. Now I thought it would be nice depending on the type of plants we have at the time if we could easily move the vertical herb garden around the patio so I’ll build a frame out of this extra two by six.
After cutting a couple pieces to length, I’ll rip them in half. Cut some half lap joints on the band saw. On a project like this I really don’t measure joints like this, I’ll just eyeball it. As I said I’m not using glue on the planter portion of this build. I’ll use it here because if the base needs replacing I’ll just replace the whole thing. I’ve moved everything to the back patio so I can attach the bottom frame and the casters.
Want to Make it Movable?
These are 3 Inch locking casters. The little guy was so eager to help his dad I had to find him a job. Obviously cedar or some other resistant type of wood would prolong the life of a project like this. I figured the cost of cedar in my area for this would run about $300. This was free for me as all of the material came from the pile of wood I have sitting in the back of my garage. and any replacement parts I may need, well… those will be free as well. Its hard to argue with free. Oh, I did have to buy the casters. Those were three dollars each.
So I guess I spent about twelve dollars on the project. For more information about this project or other diy projects you can go to my website, simply easy diy dot com. Find me on facebook and pinterest. Until then..
As I mentioned earlier, there’s no reason that you have to go this in depth when starting your own vertical herb garden. There are plenty of materials around the house or apartment that can be upcycled to fit the need. Think of old storage racks, or new cheap ones from Ikea. That being said, what we love about this project is that you get your hands dirty and its cheap. That’s just a good investment of time and effort.


 well known. With that said I’ve chosen some scrap pine left over from previous projects. I’ll cut four pieces with a fifteen degree angle for the legs to start. Yes, untreated wood will decompose over time, even cedar. However, wooden planters built out of untreated wood, will probably last a lot longer than you think. I’ll mark out every nine and a half inches or so on both sides of all four legs. I’ll need twenty cleats about five inches each. I off set the marks on each side of the legs by about an inch and a half, to give me the angles that I need for the shelves. I am not using any glue in the planter portion of this project. Over the years as different parts wear out, I want to be able to easily replace pieces of the planter. Now that the legs are done, I need some back slats. For my dimensions I’ll need about 14 board feet.
 I already have one of the planter boxes done. So for the second one I’ll place the sides on top of each other to make sure the widths match after I’m done putting the back slats on. Tack them with brads just to hold them in place. Check for square. Tack the other side. Drill pilot holes Screw them in place. I’m going to flip each box on their sides and place a board across the bottom to mimic the ground so I can get the angle right. Cut some leg braces on the miter saw. Now I thought it would be nice depending on the type of plants we have at the time if we could easily move the vertical herb garden around the patio so I’ll build a frame out of this extra two by six.