
One of the most enjoyable parts of having a home garden is the harvest. You’ve survived the pests, watered correctly, balanced the nutrients with Native Soil, and now is the time to reap the glory. Now, since you’re growing naturally at home, your vegetables aren’t going to last all that long. How much kale can one person really eat in a week?
The solution to this problem is, of course, canning vegetables at home. The best thing about canning vegetables at home is that it is surprisingly easy. A few years ago I would never have seen myself doing this, but now our house enjoys the benefits of fresh, healthy, vegetables, all year round.
Jump into Canning Vegetables at Home
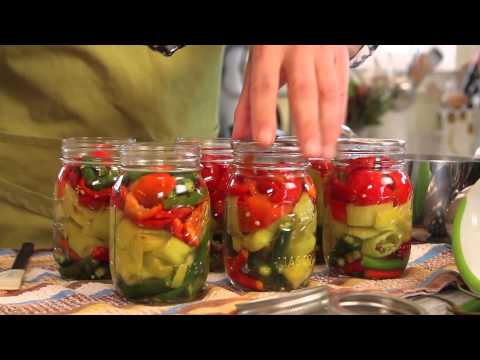
You know, canning is a simple way to get the most out of your garden, and it can be a pretty creative and fun process as well. Just look at all of these peppers. You cannot believe what my garden has produced this year. With these cayenne peppers, 8 plants produced 12 pounds at one picking of cayenne peppers.
So, it’s time to get creative and come up with some gifts that I can give at Christmas — I love pickled peppers and all sorts of things made with tomatoes. There are so many different recipes and they’re all really easy. To get started, all you need to do is prep your canning jars by washing them thoroughly with hot soapy water, rinse and drain them. You don’t need to dry them, but you do wanna discard and jars with cracks or nicks in them because they can break during the canning process.
Preparing the Cans
Next, you wanna place a rack in the bottom of boiling water canner to separate the bottom canner from the jars. Then fill each jar with about 2/3 full of water, and then fill the boiling canner until it’s about 2/3 full as well. Cover the canner and bring this to a simmer. And you’re just gonna hit this for a least 10 minutes. Then take the lids and heat them in a small saucepan and let them simmer. You see, you wanna get them both up to about 180 degrees.
It’s not necessary to put the screw tops in the water. You can just set those aside. And here’s something to keep in mind: The lids and jars must be hot when putting any sort of hot canning content in these jars. This will prevent them from breaking the glass. Now, after the jars have been heated tempered in the boiling water canner, you can pull them out with a jar lifter and pour the excess water back into the boiling water canner.
Next, just set the jars aside to put the contents in them.
Choosing Your Vegetables
At this point, this is where you want to add, in our case with this recipe, the peppers. I’m using three types of peppers — I’m using cayenne, sweet banana peppers, and these hot cherry peppers. And they’ve been coarsely chopped and I just pack them into the jars until they’re about half an inch above the rim of the top of the jar. With them all packed down and evenly distributed over the 6 containers, then it’s time to pour in the solution of vinegar and water.


What I used here was a solution of 6 cups of vinegar, 2 cups of water and 3 garlic cloves that were coarsely crushed. Now, the reason I used the garlic in the vinegar was just to infuse that vinegar with that garlicky sort of taste. It just sort of gives the hot pepper sauce a little better flavor.
Simply let the vinegar and garlic solution come to a boil. While it’s still hot, you wanna pour it into the jars and cover all of the peppers. Once that’s done, you’re ready to put the lids on top. And then take the screw bands and just gently twist them on until they’re just snug — you don’t wanna tighten them down too much. Now the canning jars filled with the peppers go back in the hot water bath and you wanna pour water over until there’s about an inch over the top of them. Bring that to a boil for 10 minutes.
Finishing Up the Canning Process
Once they’ve boiled for 10 minutes, you can take them out let them cool. Now, you want them to cool slowly. Set the jars down on a tea towel. Lay the jars out and place a tea towel over them. This insulates your jars allowing them to cool evenly. Let them sit there for 24 hours. Don’t jostle them around or anything, just leave them alone. And then you can check the seal by just taking the ring off and hold it like that. And if it’s firm and holds just like this, you’re in good shape. You can enjoy them or give them away as gifts and they will delight your friends. Give it a try.
If you’ve enjoyed these tips on making the most out of your garden’s harvest, check in with us regularly. We’ve got a lot of them.
As found on Youtube