Vertical Gardens for $1

At Upcycle and Company, you know how adamant we are about saving money when we garden. We like saving money almost as we like saving space. That’s why I was so excited to stumble upon John Kohler’s post at Growing Your Greens when he went to the 99 Cent Only Store to find himself the materials for a cheap vertical garden. Now, this wasn’t a 99 cents and up, this was a 99 Cent Only store. It’s amazing how much technology is floating around the gardening world right now, but when it comes right down to it, sometimes the simplest idea is also the cheapest idea. That’s something we can get behind.

After all, being pound for pound cheaper than our competitors is something we pride ourselves on. Let’s listen to John for a bit and get ready to #FindYourSoilMate.


This is John Kohler with growingyourgreens.com. I have another exciting episode for you today. I’m outside the 99 only stores, and the 99 only stores are a chain of stores that sell things like it’s like a dollar store basically, and I’m here today to show you guys any products that may help you grow more food at home. Now, while I’m not into a lot of the products that they sell here, they do have some good deals. In the past, I’ve gotten plant clips and seeds and even air pumps for aquariums for $1.

You never, never,  know what I’m going to find and every day they always have new stuff. I’m excited to show you guys if there’s anything I the 99 store, or the dollar store, that’ll help you grow more food at home. So, we’re here in the dollar store and we’re inside and there’s literally thousands of items and a lot of them you probably just don’t need.

Cheap Garden Starts

They don’t add any value to your life, but there are a few things here that will allow you to grow more food, and those are the things that I’m here to show you guys today. First off, of course, they have bulbs, a lot of bulbs. Most of these are not edible, but I want to show you guys a couple that are.

You got 12 Dutch onions, that’s 99 cents, defiantly a good deal. Also, they got the red baron Dutch onions. So, these bulbs you could plant not and definitely good to have some onions. So, $1 could grow you 12 onions.

In addition, they got some good deals on some seeds. The seed packet has been picked through a lot. The seeds here are not 99 cents, they’re cents. So, that’s actually 30 cents only, but 20 cents will buy you a packet of squash or cucumber or lettuce or carrots or radishes, even actually the best deal here is this corn here. This was marked at 1.99, 29 cents for a pack of corn seeds. So, next, I’m going to show you guys some planters that are actually stacking planters that they have here at the dollar store.

Cheaper Still?

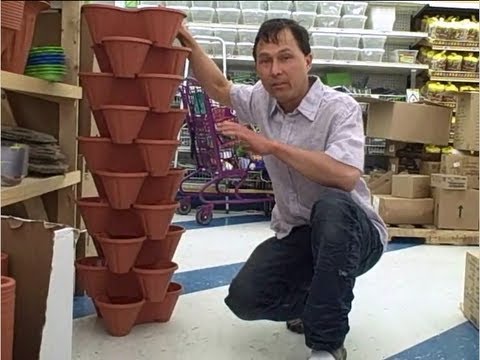
Now, these are the same, or at least very similar to the ones you just saw. Here they are right here. This is one kind. Once again, cents. These are the stacking planters. You can see this one’s 99 cents. There are no holes in this, so, you know, you’re going to have to pop some holes in it yourself, but, check this out, these are made to stack up very nicely, and they have 2 designs. They have this design and they have these guys over here. This is the circular design. They probably hold very similar amounts of soil. Check it out. For $10 you could get a setup like this. This setup is 10 high and this will grow you 30 plants.

Inexpensive plastic garden pots make excellent cheap vertical gardens
Photo by john bonham2

So, you know, definitely a good deal. $10, 30 plants, because of the 99 only store. Now, once again, these are plastic. These are made in Israel, so they may be fairly high quality but they don’t have any holes in them and if you’re going to grow something this tall it can get kind of wobbly, so you may want to drill the holes out in the middle, right through here, and put like a nice tubing through there, like EMT tubing, something like that, to stabilize it and also of course run an irrigation system and make sure you pop those holes in it.

Cheap Vertical Gardens

Now, I’m not a huge fan of plastic, but if plastic planters are going to allow you to grow more food, I’m all for it. So, next I’m going to show you guys planters that I do like, actually, that they have here at 99 only store. They got your standard clay pots. Now, these are nice clay pots. This one pot would be good for like one head of lettuce or some herbs. Actually, it’s really good to grow mint, something like this, grow your mint in here and then plant this underneath the ground so that the mint can’t spread out. So, that’s actually a nice tip, but 99 cents, a nice clay pot, definitely a good deal as well. Besides the pot, they also have potting soil for 99 cents. Now, I don’t recommend the potting soil here. You get hardly anything. This is so light, this is not a good deal, although they make it out to be.

Is it a Good Deal?

So, not everything at the 99 only store is a good deal. Go to a big box store and get some organic potting soil or organic compost instead, but another good item at the 99 only store is this guy right here. You can see it’s only, but it’s these guys. It’s a foldable plant support. You can see here, looks like a standard tomato cage.

They’re showing tomatoes here, but I wouldn’t recommend this for tomatoes. These guys just kind of pop up like this and then there are 3 bars that hold this stable so it collapses for easy storage when you’re done with the season, and, you know, for 99 cents, definitely a good deal, but I would probably only use these and not tomatoes because you know what? This is not even that tall, maybe like 2 feet tall if that.

How to Build Cheap Vertical Gardens

Last thing I want to show you guys here and the 99 cents store that can help you grow more food, especially if you’re growing vertically in cheap vertical gardens, you need to tie so that you can get your plants off the ground so that they can grow vertically ’cause you may have more airspace than you do land if you live in a residential area. These guys right here. This is the first time I’ve seen these at the 99 store. These are clips, and these allow you to basically reuse these clips to pin up your tomatoes and all different kinds, peas and plants to bamboo stakes. It’s 99 cents for 16 reusable, that’s the thing, reusable plant clips. Great deal, and these guys, on the back, are marked 2.95. So, that’s 1/3 off here, and I know that these are definitely a good deal. In addition, they just got your standard flexible plant tape.

The 99 Cent Store can be a treasure for cheap vertical gardens
Photo by KTDrasky

Finding the Deal

This stuff might cot 2-3 bucks at a nursery, just 99 cents here, but once again, I’d encourage you guy to get the reusable plant ties instead because you can use this year after year whereas if you just tear this off and tie things, usually that takes more time plus you usually got to throw this stuff away. They also have some tools down here, and a lot of these tools, you know, you guys get what you pay for.

I definitely wouldn’t recommend them. Some of them are nicer, something like this, you know, for $1, a little hand trough or shovel thing, oops, that breaks. I probably wouldn’t recommend some of the stuff that I showed you guys. They also have some irrigation things, like plastic sprinklers and whatnot. Now, once again, you guys get what you pay for and I’d probably recommend you spending a little bit more and getting a lot higher quality items, Hopefully you guys enjoyed this episode, learning more about some of these items at the 99 cent only store that’ll help you grow more food at home.

Once again, my name is John Kohler with growingoyurgreens.com. We’ll see you next time and keep on growing…

As found on Youtube

Find Your Soil Mate

Certified Organic is a Marketing Campaign


No two ways about it. The market for “Certified Organic” is enormous. The worldwide market has grown from $27 Billion in 2011 to more than $50 Billion today. Unfortunately, there is little to suggest that that term is little more than a well orchestrated organic marketing campaign.

Mythbusting the Organic Marketing Campaign

Now, there’s nothing intrinsically nefarious about the process of organic farming. It is okay, but organic farming practices are presented as the gold standard of healthy of agriculture practices. Unfortunately, there’s not much to support that claim.

A blog post that appeared in Scientific American in 2011 went through and busted so many of the widely held, but errant beliefs the general public holds when it comes to organic food production.

In fact, when studies were conducted in the UK about the efficacy of organic food, the results were pretty underwhelming.

Strong organic proponents also argue that organic food tastes better. In the same poll where 95% of UK organic consumers said they buy organic to avoid pesticides, over two-thirds of respondents said organic produce and meats taste better than non-organic ones. But when researchers had people put their mouths to the test, they found that people couldn’t tell the difference between the two in blind taste tests.

When they pushed further, experts weighed in.

“Any consumers who buy organic food because they believe that it contains more healthful nutrients than conventional food are wasting their money.” – Joseph D. Rosen (Professor Emeritus in Food Toxicology at Rutgers University)

The Organic Marketing Campaign

It isn’t that we detest organic farming or organic food production. All things considered, there’s nothing inherently wrong with organic farming. What we have a problem with is the organic marketing campaign that is feeding consumers falsehoods that make it seem as though organic food is some kind of panacea.

That simply isn’t the case. Organic farming and organic production methods are but one of many responsible, healthy, and sustainable production methods. When it seems too good to be true, it usually is.

Marketing is marketing. This is little different than “Where’s the Beef?” or “I’d like to buy the world a coke.”

When we say “we’re better than organic, and that’s on purpose.” This is what we mean.

Come find your soil mate.

Health Benefits of Fire Cider

Fire cider is one of those home remedies that people swear by. There are some serious health benefits of fire cider to be sure. The ingredients call for horseradish, a known antibacterial agent, and ginger, one of just about every Mom’s favorite anti-nausea remedy. The problem with fire cider is that for all of its purported benefits, there’s one major downside. Go to any health food store and you’ll find tiny bottles of this elixir for a staggering price.

For instance, the Amazon.com recommended fire cider is more than $20.00 for 16oz. That just seems like a lot.


The price is especially annoying when you remember that you’ve got a whole garden growing in your backyard. Let’s look into the health benefits of Fire Cider and how simple it is to make at home.

Health Benefits of Fire Cider

The cold-fighting health benefits of fire cider are widely known. They would seem to come more from the ingredients themselves than the preparation, but as with so many mystical tonics, it appears the preparation reinforces the natural health benefits. Cayenne, garlic, ginger root, and jalapenos all inspire that inner body warmth that many believe promotes a healthy immune system.

Another health benefit comes from using fire cider as a daily treatment in the cold winter months. The idea being that by exercising and cultivating a healthy immune system daily, it will be strong enough to ward an illness before it reaches crisis mode.

As a cough remedy fire cider excels when mixed with a bit of honey. Now that we know what the health benefits are, how do we go about getting them?

How to Make Fire Cider

While there are many different recipes for fire cider online that can be found with an easy Google search, there is one that our CEO and Founder swears by. It’s a tad on the spicy side, so the author recommends you adjust to your level of spice tolerance.

Ingredients:

Bragg’s Apple Cider Vinegar
Ginger root: finely chopped or grated- 1/4 cup
Horseradish root: finely chopped or grated- 1/2 cup
1 small onion: chopped
2 jalapenos: chopped
1 lemon: juice and zest
12 garlic cloves: finely chopped
Fresh Rosemary sprigs: 1-2
1 teaspoon turmeric powder
1/2 teaspoon black peppercorn ( to activate the turmeric powder)
1/2 teaspoon Cayenne powder
Raw local honey (for later)

– Go Gypsy!

What we love about this recipe is that so much of what’s needed can be found in your garden or herb garden. There’s nothing more expensive than buying herbs at the grocery store. For whatever reason, a massive bush of rosemary that grows like a weed can be had for next to nothing, but take that same bit of rosemary past a grocery store cash register and you’re going to feel the pain in your wallet.

Fire Cider Mixture

Again, we’ll go straight to the horse’s mouth on this one. Why try to improve on perfection?

Step 1: Combine Ginger, Horseradish, onion, jalapenos, garlic cloves, lemon juice and zest in a quart sized canning jar.

Step 2: Poor apple cider vinegar into the jar.

Step 3: add rosemary, Cayenne, Tumeric, black pepper

Step 4: Shake real good, and store in a dark place, such as a cupboard or closet for 4 to 6 weeks. Once brewed, you will find most of the ingredients have broke down, however you should still strain with a cheesecloth or strainer. Add local raw honey to taste! I like to do no more then a few teaspoons. I like to keep mine in an easy to pour bottle so I can take shots or use as needed

And that’s pretty much it. A little pre-planning when it comes to growing and a fair amount of patience will yield you this aromatic potion just in time for the autumn chill. Let us know how you make yours and what you think the best health benefits of fire cider are.

4 Facts You May Not Know about Certified Organic

It seems like everyone has fallen in love with all things “organic.” But why? The organic industry has convinced the average consumer that if a product is stamped with that “USDA Certified Organic” label, it implies that the product is healthy. That the product is somehow free of factory farming practices, chemicals, pesticides, and carcinogens. Is that really the case though?

It’s not that certified organic farming is bad. But its just not as pure as they’d like consumers to believe. We aren’t saying certified organic is a conspiracy theory, but marketers are marketers and in a 50 billion dollar premium based industry, facts are going to be presented in the best light possible.organic fruit photo

Here are 4 little secrets the “Certified Organic” industry doesn’t want to get out.

1. Certified Organic Food Production can Include a Ton of Pesticides

Guess what? Even plants that are “certified organic” need pesticides. The impression that organic crops don’t require pesticides is entirely false. Organic production allows for the inclusion of more than 40 different pesticides. The purpose of pesticides is to kill. Doesn’t matter if it is applied in organic or non-organic farming. Obviously, they’re not designed to kill people, there’s really no guarantee they are any safer than their non-organic brethren.

You can find a list of what’s allowed here.

2. Food Labeled as Organic May Not Even Be Organic

Yep. You read that right. In short, most sizable organic producers also produce non-organic crops. Often of the same foodstuff.  This can lead to sloppy record keeping and the unintentional blending or mixing of those organic and non-organic crops. You’d be hard-pressed to tell the difference between an organic orange and a non-organic by sight alone. Good thing they have that sticker saying they’re “certified organic.” Right…

certified organic is visually difficult to seeWhat’s more, the official definition of “certified organic” by the USDA seems to acknowledge some of this unintentional blending. After all, only 95% of contents must be organically produced to carry the certified organic label. 95% is pretty good, but even if the realistic blend is only 70% organic, it can be labeled “made with organic ingredients.” And again, you can’t tell just by looking at a piece of fruit or a bag of nuts and definitively tell which are organic and which are conventionally produced.

3. Organic Food Can Contain Non-Organic Ingredients

So, number two doesn’t really matter. Organic food production allows for the inclusion of 43 synthetic substances.  In addition, there are 34 non-synthetic, but also non-organic, substances allowed in the production of something labeled “certified organic.”

The organic industry likes to imply that their food is pure, justifying the higher cost, but, that isn’t strictly true. It’s not as though all of these substances are nefarious, but when you’re paying a premium for organic cheese, you probably would like it to be free of wood pulp filler. Check the ingredient list. Take a look and see if there’s cellulose in that cheese. That’s wood pulp.

4. Certified Organic Food is Healthier

If a consumer is paying a 20% premium for certified organic food, ought it not be healthier? One of the central tenants of Native Soil is that it helps restore the soil nutrients. Those nutrients are then transferred to the plant and then to the food. If certified organic practices produced healthier food, we’d be on board. Problem is there is no evidence to show that certified organic is really any better.

When the UK produced a study between organic and non-organic food, the nutrient density was nearly indistinguishable.

“Any consumers who buy organic food because they believe that it contains more healthful nutrients than conventional food are wasting their money.” – Joseph P. Rosen (Professor Emeritus of Food Toxicology at Rutgers University)

So if it isn’t any healthier, why do consumers continue to throw money into the certified organic system with such enthusiasm? Marketing.

Conclusion

At the end of the day, just because something isn’t “certified organic” doesn’t mean that it isn’t an outstanding product. Certified organic is basically a marketing scam. Why buy certified organic fertilizer when all you’re paying for is someone’s enormous marketing budget. Kudos to that industry for getting their message out in such a successful way, but its just a marketing message.

Give Native Soil a whirl. Come find your soil mate.


Beginner’s Guide to Canning Vegetables at Home


One of the most enjoyable parts of having a home garden is the harvest. You’ve survived the pests, watered correctly, balanced the nutrients with Native Soil, and now is the time to reap the glory. Now, since you’re growing naturally at home, your vegetables aren’t going to last all that long. How much kale can one person really eat in a week?

The solution to this problem is, of course, canning vegetables at home. The best thing about canning vegetables at home is that it is surprisingly easy. A few years ago I would never have seen myself doing this, but now our house enjoys the benefits of fresh, healthy, vegetables, all year round.

Jump into Canning Vegetables at Home

You know, canning is a simple way to get the most out of your garden, and it can be a pretty creative and fun process as well. Just look at all of these peppers. You cannot believe what my garden has produced this year. With these cayenne peppers, 8 plants produced 12 pounds at one picking of cayenne peppers.

So, it’s time to get creative and come up with some gifts that I can give at Christmas — I love pickled peppers and all sorts of things made with tomatoes. There are so many different recipes and they’re all really easy. To get started, all you need to do is prep your canning jars by washing them thoroughly with hot soapy water, rinse and drain them. You don’t need to dry them, but you do wanna discard and jars with cracks or nicks in them because they can break during the canning process.

Preparing the Cans

Next, you wanna place a rack in the bottom of boiling water canner to separate the bottom canner from the jars. Then fill each jar with about 2/3 full of water, and then fill the boiling canner until it’s about 2/3 full as well. Cover the canner and bring this to a simmer. And you’re just gonna hit this for a least 10 minutes. Then take the lids and heat them in a small saucepan and let them simmer. You see, you wanna get them both up to about 180 degrees.

It’s not necessary to put the screw tops in the water. You can just set those aside. And here’s something to keep in mind: The lids and jars must be hot when putting any sort of hot canning content in these jars. This will prevent them from breaking the glass. Now, after the jars have been heated tempered in the boiling water canner, you can pull them out with a jar lifter and pour the excess water back into the boiling water canner.

Next, just set the jars aside to put the contents in them.

Choosing Your Vegetables

At this point, this is where you want to add, in our case with this recipe, the peppers. I’m using three types of peppers — I’m using cayenne, sweet banana peppers, and these hot cherry peppers. And they’ve been coarsely chopped and I just pack them into the jars until they’re about half an inch above the rim of the top of the jar. With them all packed down and evenly distributed over the 6 containers, then it’s time to pour in the solution of vinegar and water.

canned peppers photo
Photo by tsakshaug

What I used here was a solution of 6 cups of vinegar, 2 cups of water and 3 garlic cloves that were coarsely crushed. Now, the reason I used the garlic in the vinegar was just to infuse that vinegar with that garlicky sort of taste. It just sort of gives the hot pepper sauce a little better flavor.

Simply let the vinegar and garlic solution come to a boil. While it’s still hot, you wanna pour it into the jars and cover all of the peppers. Once that’s done, you’re ready to put the lids on top. And then take the screw bands and just gently twist them on until they’re just snug — you don’t wanna tighten them down too much. Now the canning jars filled with the peppers go back in the hot water bath and you wanna pour water over until there’s about an inch over the top of them. Bring that to a boil for 10 minutes.

Finishing Up the Canning Process

Once they’ve boiled for 10 minutes, you can take them out let them cool. Now, you want them to cool slowly. Set the jars down on a tea towel. Lay the jars out and place a tea towel over them. This insulates your jars allowing them to cool evenly. Let them sit there for 24 hours. Don’t jostle them around or anything, just leave them alone. And then you can check the seal by just taking the ring off and hold it like that. And if it’s firm and holds just like this, you’re in good shape. You can enjoy them or give them away as gifts and they will delight your friends. Give it a try.

If you’ve enjoyed these tips on making the most out of your garden’s harvest, check in with us regularly. We’ve got a lot of them.

As found on Youtube

Start Growing Your Own Vegetables Today

How We Save the World with Poop

Outside efficacy, my favorite benefit of Native Soil is that it is 100% local upcycled waste. Sustainability is extremely important to the team at Upcycle. If it wasn’t sustainable, we wouldn’t do it.

One of the first questions I get asked is how you found your way to making fertilizer. Our friend Rob Greenfield helped make that abundantly clear. Join us and Find Your Soil Mate.

https://youtu.be/xl1_Rg1fJY4

The next question is almost universally is, why’d you get on board? Simply put the message is simple. Efficacy married with sustainability. That’s a rare combination when environmental benefits line up so squarely with an ability to work in private enterprise… so we jumped.

We thought this waste, going hundreds of miles away to sit in landfills was a shame. We know that certified organic is a scam. We think you will as well. We are on a nutrient revolution. One to replace the nutrients lost after the last century of factory farming. We are proud to be standing amongst those who don’t believe the certified organic hype.

No kidding. We’re trying to save the world with poop. Email us. Message us. Harass us on social media. We’re proud of the fertilizer we made here and we sincerely believe that products like this are going to save the world in the next few decades. Join us. Help us put waste to work and find your soil mate.

How to Make Cheap Sun Dried Tomatoes

Sun-dried tomatoes are a real treat but they are expensive to buy at the store, so we made a nice big batch of cheap sun dried tomatoes right from our own garden. They’re easy to make. Let me show you how.

Preparation for Cheap Sun Dried Tomatoes

Wash the tomatoes in your sink first, of course, and place them in a big container. Set up tomato slicing station with a knife and cutting board and medium-sized bowl, several large baking sheets and, of course, your big container of tomatoes. You can use any tomatoes but we like to use Roma for our cheap sun dried tomatoes. Choose one of your nice clean tomatoes, cut off the stem and slice the tomato in half.

cheap sun dried tomatoes photo
Photo by Klearchos Kapoutsis

Rub out the seeds and the juiciest parts of the tomato into the bowl so you can save all that good stuff for later. Then cut the tomato into even thinner slices and put them all onto a large baking sheet. Try to load the tray with skin side down but don’t obsess over it. It will all work out .

The Drying Process

You can begin the drying process by setting up a simple wind tunnel inside. Just set a regular box fan on any table and put all your tomato trays in front of it.

The breeze from the fan starts evaporating moisture right away. We put a cheap plastic tablecloth over the fan to help direct the wind toward our tomato trays. You can use this technique while you’re preparing all of your trays, but solar power is absolutely the best, most natural way. We cover all of our trays with a big window screen . It will take two or even three days in the sun to completely dry the tomato slices into raisin-like appearance and texture. We bring our trays in at night and put them in our tabletop wind tunnel so the tomatoes will continue drying through the night.

Bonus Savings

And remember all the juice and seeds that you collected in your bowl earlier? Just use a screen or a strainer to separate them so you can enjoy an amazingly fresh glass of tomato juice and dry the seeds for next year’s garden. We store ours in glass jars filled with olive oil and a little bit of basil. They’re great in salads, of course, and you can’t beat a bagel with cream cheese and sun-dried tomatoes. Don’t forget that tomatoes grow extremely well in a cheap raised garden bed. We’ve got a great tutorial on how to build one for less than $20.

Have you made your own cheap sun dried tomatoes from your garden? Let us know in the comments below or post your pictures on Facebook.


As found on Youtube

Grow Next Harvest’s Tomatoes with Native Soil

What’s the Downside?

This comic by artist Joel Pett has been making the rounds lately, but its message underscores the philosophy behind what we’re doing at Upcycle. While we’re certain the science is in and has been spoken, there are still those out there, in alarmingly powerful positions, that don’t “believe” in climate change. That said, whether they “believe” it or not, climate change is happeExplain to me the downside?ning. Ask the residents of Houston or any Floridian.

Moving from coal to solar, or wind doesn’t hurt anyone, and is potentially extremely valuable in the world of energy production. Similarly, we produce a tremendous amount of waste. It’s not sustainable. The local water plant here in San Diego processes 175 million gallons of waste water per day. Per day! And, ask any San Diegan about their beach habits the days and weeks following a slight drizzle. The amount of pollution and general garbage that wash out into the Pacific Ocean after any kind of precipitation is as staggering as it is toxic.

And so that leads us to this weeks #ThursdayThoughts. Seriously, what’s the potential downside in treating a problem that actually exists… even if you aren’t sure of the cause?

Just because we don’t know exactly what causes cancer doesn’t mean that we don’t treat people for the symptoms and physical realities of cancer right? So, why wouldn’t we treat the planet’s illness even if we don’t understand exactly where that disease came from?

Keep helping us put waste to work. Growing local food, reducing carbon and making landfills against our religion.

What do you guys think? Sign up to our newsletter to learn more about how we put waste to work. Or join us on Facebook or Twitter to engage in the discussion.


Cheap Raised Garden Beds


San Diego may have amazing weather, great tourism, and a laid back vibe, but what it does not have is quality soil. Aside from the river bed in mission valley, the landscape here is primarily decomposed granite or clay. Not exactly the most hospitable, inviting environment to grow healthy vegetable plants. Well, any plants for that matter. What this means is that growing your vegetables in cheap raised garden beds is the most attractive prospect. Not only do cheap raised garden beds allow you to blend a specific amount of soil with a high-quality fertilizer like Native Soil, the basic rectangular beds make optimizing the square footage an easy task. Length multiplied by width.

Whoever said we’d never need geometry after high school?

In most cases building cheap raised garden beds is as easy as a few stakes and a few fence boards, but there are multiple ways to skin a cat. I’ve compiled several different video tutorials here to get you started on your own cheap raised garden beds.

Truly Cheap Raised Garden Beds

The Crafty Gemini is a woman after my own heart. In this tutorial, she shows us how to build square garden beds for under $15. When you keep the cost of your bed down, you can afford to spend more time, energy and money on making sure the growing medium, the soil, is extremely nutrient dense. One of the aspects of Native Soil that we really like is that it is extremely water soluble, meaning the nutrients are available to plants right away. With a $15 garden bed and Native Soil you could see your starts producing almost immediately.

High-Quality Raised Garden Beds

My raised garden beds were test beds; never meant to look this nice.  Take the time to build relatively cheap garden beds that will stand up to the harsh weather. These beds are using higher quality lumber which means they should last several seasons at the very least.

Neighbor Friendly Garden Beds

My neighbors take extreme pride in their front yards. So much pride that they are quick to tell me when I’m creating an eye sore in my own front yard. When we’re trying to maximize our square footage available for food, I like to include the front yard. Unfortunately, my neighbors don’t always appreciate the DIY ethic I embody. Every cheap raised garden bed project is not appropriate for every yard. Not even ones with high quality treated lumber. This stone border garden achieves the desired square footage for vegetable growing and is easy on the eyes.

Get Out There and Grow

Once you find the right project for your space, get out there and grow. Send us pictures of your progress. The urban gardening movement is extremely exciting. Get out there and plant something.

Join our Email List to learn more about backyard urban vegetable gardening.

[rainmaker_form id=”802″]

Grow A 6 Foot Tomato Plant With A Garden Infrastructure Plan

While Upcycle and Company creates sustainably sourced fertilizer from upcycled waste that is dynamite, we know it isn’t the only piece to the puzzle. One of the most popular vegetables to grow in any backyard or patio garden is the humble, yet versatile, tomato. With its lycopene density, not only is it one of the easiest plants to start with, it is also extremely healthy. As a vining plant, it needs more direction than a toddler, so garden infrastructure is an important part of garden planning.

Garden Infrastructure

The guys over at Grow It Now Garden Products have some of the easiest to implement garden infrastructure that we have seen. This is obviously a step or two above building your own raised garden bed in an hour. While we support the DIY ethic, we also understand it isn’t for everyone.

If growing is really your ultimate goal outcome, you might consider ordering a prefabricated kit. Watch the video below to learn how to grow a six foot tomato plant using the right technique. Native Soil Fertilizer is essentially the afterburner in this engine. While we are focused primarily on tomatoes here, a more comprehensive infrastructure plan might be the next step.

How to Get Started

Hello this is Russel Smith with Grow it Now Garden Products. I am here with you today in my backyard garden to talk about how to grow a six foot tall tomato plant. In one of my previous episodes I planted this tomato plant. What I did was I buried it deep. I dug a hole about two feet deep. I buried my tomato plant in there so that only about six inches was sticking up out of the ground. And then I put an eleven inch miniature greenhouse over that. Staked it down. And then I put the eighteen inch miniature greenhouse over that.

Add a Little Sun

What those do is they add heat to the plant so it stimulates plant growth. And since I’ve done that video and shared it with the gardening community I have had a lot of questions come back and the questions are what do I do with the plant when it grows out of the eleven inch miniature greenhouse? Do I take both of them off? And the answer to that is no. Only take the eleven inch miniature greenhouse off and then leave the eighteen inch miniature greenhouse over top of it, until it grows out of the eighteen inch miniature greenhouse.

In this case, that was as far as I went. On some of my other tomato plants I actually went to a thirty-six inch miniature greenhouse and added even more growth and plant stimulation to the plant. In that case you are going to have to make sure you come in and shake the plant in order to get the pollination. So with this one, that was the secret sauce.

mini greenhouses are an integral part of any garden infrastructure plan that yields enormous results
Photo by raludwick

I dug the hole, buried it deep so that only six inches were sticking out of the ground, put my eleven inch miniature greenhouse over it and then the eighteen inch miniature greenhouse over that. Since that video I have also had the question well what do you do for fertilizer? So here’s my secret to fertilizing. Since I’m getting in the ground early, I’m planting my tomatoes early and I’m trying to push the season with the miniature greenhouses.

I like to prepare my garden in the fall for spring planting. So what I’ll do every fall is I put four to six inches of cow manure overtop of the garden and then I till it in really deep. So that is one of the things that I use to fertilize.

#NOrganic Fertilizer

[Editor’s Note] This next section Russel discusses the fertilizer blends he used to achieve this result. Native Soil is an off the shelf fertilizer that meets these criteria. We firmly believe that our sustainably sourced blend is better than “certified organic.”  Our future friendly fertilizer blend is as important as any physical garden infrastructure.

The other thing I use to fertilize is I’ll use a dilute solution of fertilizer. Off the shelf fertilizer. So that is a nonorganic way, and then I mix it with other organic fertilizers. So I experiment both ways. If you are a new gardener I would recommend starting out with an off the shelf all-purpose fertilizer and then weaning yourself off of that to a more organic fertilizer. So on this six foot tall tomato plant you can see I have a lot of tomatoes growing. I probably have fifty or so tomatoes on this plant, just going like crazy. And the other thing is that you can see the stems on these up high. Look how thick that stem is.

It is about one inch thick. Down low there is only one stem coming out of the ground and that is feeding off of a massive root base in order to support this whole tomato plant. So tip and trick, burry it deep, put the eleven inch miniature greenhouse overtop of it, eighteen inch overtop of that..

As found on Youtube

Add Native Soil to the Mix

How to Water Your Vegetable Garden for Summer Heat

I’m not sure if you’ve noticed, but the Sun is going to set slightly earlier and the heat index is climbing steadily here in San Diego. As of the date of this publishing, California isn’t currently in a drought, but that doesn’t mean that conserving water, especially in our garden landscaping isn’t important. Saving water in all contexts is important. Vegetable gardens require a fair amount of water to ensure that the plants grow up healthy and happy. Here are some of our favorite tips for how to protect and water your vegetable garden for summer heat.

Summer requires you protect your vegetable garden for summer heat
Photo by velkr0

Water Early

This one is kind of a no-brainer but if you can get the water on the ground earlier, it has more time to absorb and takes longer to evaporate. Not to mention the plants can absorb more water if there is more water available. You want nice big juicy vegetables coming off your plants, so set an early alarm or a water timer and set it for early in the morning, preferably before dawn. If you’re using Native Soil, and I hope you are, you can use less water in general as Native Soil features high water soluble nutrient density. This means less water gives the plants more nutrients than comparable fertilizers.

Canary in the Coal Mine

squash plant photo
Photo by Leeks ‘N’ Bounds

The big leafy plants are usually the first to show signs of dehydration and other forms of distress from the heat. The broad leaves use a lot of water and more moisture is sucked out of the larger surface area. Keep a close eye on your squashes, your lettuces, and your cucumbers to find the plants that are really feeling the stress. Water your vegetable garden for summer heat the minute you see those big leaves start to wilt. That will help you dial in the proper schedule and time of day to deploy your watering.

Water Your Vegetable Garden for Summer Heat Less Frequently

This point is more about conservation so you’ll have to play around a bit to find the most useful frequency to water your vegetable garden in the heat. In most parts of San Diego, even in the summer, a heat wave doesn’t last too long and the coastal microclimates are still pretty mild. In this case, watering twice a week may be sufficient if you’re watering at the right time of day. On the other hand, if you’re in the inland valley areas of the east county, the summer heat can be both consistent and brutal. Even if you have all of your other tips and tricks employed, you may find yourself needing to water four times during the week.

Use Raised Garden Beds

Using raised garden beds aren’t just for areas with limited space and one of the great balcony garden ideas. They are also easier to saturate with water as the volume is finite. You’re not going to find random grasses, weeds, and trees leeching that precious water from your heat stressed garden. Here’s a pro-tip, combine the use of hay bails with a cheap raised garden bed. Straw is extremely water absorbent. In fact, farmers have to worry about their hay bail stacks getting wet as the chemical reaction is sufficient to heat the hay to the point of combustion. You’re not going to have it packed in that tightly, but we highly recommend growing in straw. Check out our article on building cheap raised garden beds to restructure your garden to be as resistant as possible.

At Upcycle we hope you’re able to find the right way to water your vegetable garden for summer heat. It’s a bit of a tricky learning curve, so err on too much water to start and keep an eye on those big leafy plants. There’s nothing like a backyard barbecue featuring your own home grown produce. Find your soil mate.

Garden Planner – Your Seasonal Garden

One aspect of living and working in San Diego is the ability to grow basically anything year round. We don’t really have “garden seasons” like the pour souls in other parts of the country. Our Mediterranean climate means not having to worry about little worries like frost, snow, tundra… you get the point. Even so, if you want a great garden, you need to be a master garden planner.

Just because you can grow anything at anytime doesn’t automatically mean that you should. Planning a garden is half the battle, so knowing what you want to grow and when can be a somewhat daunting task.

Garden Planner to the Rescue

We came across a great app to help out in that arena. It’s called Garden Time Planner and it will walk you through the process of growing whatever you want and give you a pretty accurate estimate of when what you’re growing will be mature.

It is region specific, so even if you’re not in California and are blessed by a mild climate, you can really dial your garden in. Terrible weather is not an excuse not to grow.

https://youtu.be/c6ZHgqoQxT0

The app is made by the Burpee company, so you know it is going to be made specifically for gardeners. Burpee has had gardeners backs from all the way back in the late 19th century. They’re synonymous with home gardens.

As you can see, the app is easy to use and really provides the specific data to ensure that your grow is going to be a hit. Aren’t smartphones wonderful?

Alternatives to Garden Planner

If smart phones and apps aren’t your style there’s nothing wrong with going analog. A simple day planner will allow you to chart your garden progress and growing timelines. There are several day planners and journals that will help you to track your growing season.

I particularly like the vegetable gardeners handbook. Its light and simple, straight forward and to the point with tons of practical advice.


Growing in Straw Bales

We’ve been pretty adamant at Upcycle and Company that just about anyone can be a gardener. One of the most common objections we hear from people who would love to grow their own food, but they’re convinced they don’t have space. No outside yard means no growth in their minds. Well, they couldn’t be further from the truth. How about a hay bale garden? We posted a link on Facebook this last week that shows how anything can be grown at home in hay bales.

Gardens can be planted anywhere. Even on concrete balconies or driveways.

The idea behind straw bale gardening is simple.  Plants grow in the top of the straw, which begins decomposing as soon as it gets wet. As the straw breaks down, it turns into a rich, compostable planter that’s ideal for growing vegetables.

The advantage of straw bale gardening is that you can set the bales anywhere where it’s sunny, as long as you can keep it watered.  poor soil?  it doesn’t matter.  you can even set the straw bales on a concrete driveway.
the first step – get a bale of straw.  you can find them at most garden centers and feed stores for under ten-dollars.

A hay bale garden can be placed atop nearly any surface. Just keep it wet.
Photo by Jason Riedy

Sounds like a pretty good deal. At Upcycle, we created #NativeSoil to help those without appropriate growing conditions to get out there and do some practical growing.

Prep Your Hay Bale Garden

Prepping the hay bale is a two-week process, so make sure you plan ahead. Step 1, thoroughly wet down the hay bale. From gardeners.com:

The first week

  • Water the bale thoroughly, until water runs out the bottom of the bale. Sprinkle the surface with a nitrogen source (see box), applying at the recommended rate.
  • Every other day, add more of the nitrogen source; water thoroughly. Do it a total of three times during the first week.
  • On the days you don’t apply nitrogen, just water the bales thoroughly.
  • The second week
  • For the next three days, apply the nitrogen source daily at half the original rate. Follow up with thorough watering.
  • After three days of adding nitrogen, water daily.

The last step is to add a well balanced all around fertilizer like #NativeSoil.  Since Native Soil is a slow release powdered fertilizer, the nutrients are available immediately and released slowly over the growing season. This allows you to have a one and done fertilizing philosophy. Once the hay bales begin to decay from the inside, they will begin to heat up. In roughly a week, you’re looking for an internal temperature of 75 – 80F.

At that time, the bed is primed and ready to receive your vegetable starts.

Make sure you keep your hay bale garden wet.
Photo by Doug Beckers

Don’t ever let anyone tell you that your concrete slab isn’t a great place to grow some tasty vegetables. When you’re growing in small spaces, you have to sometimes think outside the box.

The best part though? No weeds and you don’t even have to get your hands dirty.

Watch KTVB’s coverage of this hay bale garden phenomenon.

Photo by Doug Beckers

Superfood Consumption – You Really Are What you Eat

As Americans, we have developed a bad habit of not really watching what goes into our bodies as fuel. We tend to eschew this part of our daily routines. So busy that we run out of the house without eating breakfast, subsisting on coffee and donuts until the mid afternoon when we break for a lunch that ends up being pure junk. Because junk is quick. At Upcycle, we prefer to take life a little slower and make sure that we keep an eye on our superfood consumption.

Superfood Consumption Benefits

What’s more is that you can grow so many different superfoods right in your own home. You don’t have to go to the local health food store to get some fancy macrobiotic, genetically engineered frankenfood. No way. You can pull your superfoods for consumption right out of your own plants. And it’s a double whammy. While you’re saving money growing your own superfoods for consumption, the basic act of nurturing a plant from seedling to mature, produce producing, plant is mentally satisfying in its own right. Wait… that’s a triple whammy.

Recent dietary research has uncovered 14 different nutrient-dense foods that time and again promote good overall health. Coined “superfoods,” they tend to have fewer calories, higher levels of vitamins and minerals, and many disease-fighting antioxidants.

What Should I Grow?

Blueberries are a great food for beginning superfood consumption
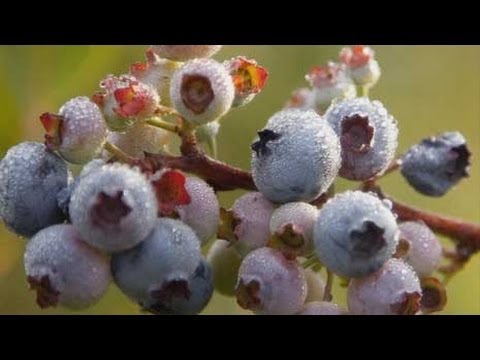
Beans (legumes), berries (especially blueberries), broccoli, green tea, nuts (especially walnuts), oranges, pumpkin, salmon. soy, spinach, tomatoes, turkey, whole grains and oats, and yogurt can all help stop and even reverse diseases such as hypertension, diabetes, Alzheimer’s, and some forms of cancer. And where one might have an effect on a certain part of the body, it can also affect the health of other body functions and performance, since the whole body is connected. With these 14 foods as the base of a balanced, solid diet, weight loss gimmicks and other fly-by-night programs can become a thing of the past in your life.

Why Should I Be Consuming Superfoods?

Conversely, the ill-effects of an unbalanced diet are several and varied. An unhealthy diet causes low energy levels, mood swings, and exhaustion. Add weight change, body image issues and you’ll know your diet is unbalanced. An unbalanced diet can cause problems with maintenance of body tissues, growth and development, brain and nervous system function, as well as problems with bone and muscle systems.

Symptoms of malnutrition include lack of energy, irritability, a weakened immune system leading to frequent colds or allergies, and mineral depletion that can trigger a variety of health concerns including anemia.
And since the body is connected, realizing that an unhealthy body will result in an unhealthy spirit only makes sense. When we nourish our body with these superfoods and complement them with other nutrient-dense and healthy fresh foods, our spirit will be vitalized and healthy as a direct result.

Start Today

Don’t wait. Every day you wait is a day you’re living with your poor diet.

Many modern diets based on prepackaged convenience foods are sorely lacking in many vitamins and minerals. That vitamin deficient diet will affect our mental capacities as well. It will cause anxiety, confusion, and the feeling of ‘being in a fog’ all the time. If you’ve ever spent a day at the office where you have the mental prowess of a block of ill-treated wood, you know what brain fog is all about.superfood consumption can mitigate stress, anxiety and brain fog

As a result it is so easy and rewarding to grow your own superfood from scratch. Native Soil serves as a perfect amendment to any home garden. Urban areas, tend to have nutrient deficient soil. It is as if the soil absorbs the personality of the humans scurrying around it. Just a little bit of Native Soil to restore the soil health is a no-brainer.

Conclusion

Superfoods can be the basis of a sound, healthy, nutritious solution to curing many of these ailments and more. Don’t let another foggy day slip by. Seize the day. Get your hands dirty.

Growing Herbs : How to Design a Balcony Herb Garden

WA balcony herb garden is a great, fun, way to get started growing your own healthy food at home. Now, we’ve gone over the basics of balcony herb gardens before, when we touched on how to grow vertically in small spaces to maximize your output, but now we’re going to talk a bit about actually designing what goes in your balcony herb garden.

What Do You Eat?

The first step in any good garden is to know what that goes in is going to be eaten when it comes out. If you’re growing a whole bunch of plants, or herbs in this case, that you’re not going to eat, then it’s just a huge waste. Think about the spices cabinet you currently have in your apartment. If you’re anything like I was, you’ve been hauling around a ton of spices, inheriting other people’s spices and herbs along the way until you’ve got a cabinet full of turmeric and jerked spice that you’ve never opened. Not that there is anything wrong with turmeric or jerked spice, but I don’t eat a ton of food that uses those.

A well planned balcony herb garden can replace your cluttered spice rack
Photo by TinyTall

Similarly, if you’re starting this garden project as part of a New Year’s resolution to eat completely different than you have in the past, then you might want to consider if you’re biting off more than you can chew at once. If you’re moving from greasy fast food every meal of every day to complete home cooking, adding in the growing project might be a bit ambitious.

Start with Some Basics for Your Balcony Herb Garden

Try and grow some herbs that show up across a range of recipes. For instance, I love rosemary. It goes with chicken dishes, steaks and is great in scrambled eggs. Plus, it is extremely easy to grow. There’s really very few dishes where a bit of rosemary won’t brighten up. I also like to make a number of Italian sauces because they’re easy and I get to use the tomatoes from my backyard. So, in my home balcony herb garden I grow oregano, basil and parsley. While those were all designed for sauces, they’ve also found their way into many other dishes I make.

These are just the basics of what I do, but you can experiment with your herb planning based on your own menu planning.

Size Matters

The size of the plant you’re growing is a critical planning step for your balcony herb garden. Some herbs, like rosemary, can grow into huge bushes that take over the whole tiny space. Others like basil are more of a tall leafy plant that tends to be a bit more delicate. Below is a video from VanVeenBulbs.com that helps walk through what Yolanda did when planning her herb garden.

Hi, this is Yolanda, from vanveenbulbs.com. In this segment, we’re going to learn about how to design an herb garden, so your garden is part of your own personality, so I love planting plants in my garden, that I use in the kitchen, and so the first thing that you should do, when you design your garden or your herb garden, is deciding what herbs you want to grow, and an easy way to decide, is to just look in your cabinets, and so I always look and see which herbs do you really use? And then those are the ones that you should grow, because if you’re growing a lot of herbs that you’re not using, then it’s kind of silly, and it might be a waste of space, so make sure first, to figure out what kinds of plants you want to grow.

Plan to Your Pallet

rosemary is a common for a balcony herb gardenI love rosemary, and I love my Cajun spice, and it’s got thyme in it, so I think I can try to make my own too. It’s just cayenne pepper and thyme, and a few other seasonings, so I can try to make it on my own. There’s dill seed, basil leaves, parsley, oregano, so I know I want to put those plants in my garden. A few of my other favorites are basil. I love them in all my pestos, and with a tomato, and some cheese on it. Thyme of course, we talked about that, and spearmint. Spearmint is such a nice plant in the garden, because you can just take a little piece and put it in your mouth, and it’s just like chewing gum almost. It makes you feel fresh. It’s a nice scent, and a little bit with some lemonade, is really nice. First thing when you’re designing your garden, decide which plants you use everyday. Then which plants you use in your kitchen. Once you’ve decided that, then you need to find a place to plant it.

Small Herb Garden Spaces

Whether it’s just the window sill inside the house, or a nice sunny location, outside of the house, they will grow almost anywhere. You can plant them on a deck. You can plant them on a patio. Just remember, you need at least a half a day of sun, because herbs really like a lot of sun. Now, you can plant them in containers, or you can put them in nice raised beds, too. You can plant them almost anywhere, so even if you have an area of your garden that you’re not using, just throw some compost on top of it, and plant a few herbs, and you’ve got a nice herb garden. Now, once you’ve decided that you do want an herb garden, and which plants you want in it,and where you’re going to put it, then you need to figure out what kind of layout. When you’re deciding where to plant them, always decide based on the height and the size of the plants.

Bigger Herbs, Bigger Return

Let me show you, so the larger herbs that grow bigger, you should put to the back of the bed. Or at least the middle. This is rosemary, and it can grow kind of big and more into a bush. Another plant that you’ve got to almost be careful with, is the mint, because mints kind of take over. Because they really do multiply quickly, and they’ll push the other plants out, if you let them. So when you plant them, keep them either contained in a container in the bed, or plant them on the edges where they’re not really going to take over. You can control them a little bit more, so oregano is a great plant too, and it stays a little bit smaller, making it great for a balcony herb garden. So make sure and put that towards the sides of the beds, so that they don’t get kind of covered up by the other types, and tarragon is a great plant.

Stack Your Herbs for Maximum Sun

Tarragon gets a bit bushier, not quite as big as my rosemary. So it will be more of a plant that I put in front of my rosemary, but before my mint. Or before my cilantro even, that gets a little bit shorter. Thyme too is a beautiful plant, that makes almost a ground cover. It never gets really big, so it’s a great plant to put on the edges. When you’re designing an herb garden, you can keep it very formal, or keep them very separated, or you can throw them in all together. It’s up to you, so go out and start your own herb garden, and enjoy the benefits.

To sum up, it is all delicious fun. What are you growing in your herb garden? Share with us on Facebook. If you want more gardening tips in your inbox, sign up below and be on the look out for special offers on Native Soil!

[rainmaker_form id=”530″]

Tiny Gardens Are Bountiful – Grow Your Own Balcony Garden

Bountiful Gardens in Tiny Spaces – A Profile

I’ve really been digging the work being done over at SpacesTV lately. That YouTube channel is giving a good deal of coverage to one of our favorite topics here at Upcycle & Co, balcony gardening and tiny gardens. Just because you don’t have much space doesn’t mean that you can’t have a beautiful, bountiful, and productive garden. Tiny gardens can be surprisingly productive.

This tiny space in north Manhattan (where space is clearly at a premium) uses planning and vertical space to create a lush, inviting area that is overflowing with useful plants. Just remember, when you’re working in urban environments, there are more pollutants that degrade soil quality over time so it is imperative that you revitalize that soil. Give it the nutrients it needs to produce for you.

Enjoy the interview and walk through below and let us know how you’re inspired to create your own tiny garden space.

DENTON TARVER: Today on Urban Gardener– we’re headed to a Brooklyn patio garden. This wall this extraordinary. It starts from the floor and goes as high as anybody can reach. It contains all levels of plants, all kinds of blooms. We have vines. Even trees. This looks like we have a bunch of different kinds of vines growing up here. They’ve all been put together in a really interesting way. If you look at this wall long enough, you keep seeing new things that jump out at you, which is really interesting, especially in a small space like this. This is called nasturtium. But it has these interesting round leaves. It’s really beautiful bloom, which is also edible.

MALE SPEAKER: This was our rooftop, and for the first year, we never used it ’cause it would get too hot.

Eventually, I was like, I’m gonna bite the bullet and spend the money and build a deck. This wall is aluminum siding. And as you can see, it’s really boring. And that’s my window right there. That’s where we started.

DENTON TARVER: So you made a little bed.

MALE SPEAKER: A little bed–

DENTON TARVER: And then you started layering up.

MALE SPEAKER: Yes. Yes.

DENTON TARVER: And now we have vines everywhere.

MALE SPEAKER: This whole thing, actually, has a lot of purpose. There used to be a couple that sat in that window all the time looking over here.

DENTON TARVER: A little leering going on.

MALE SPEAKER: So I wanted to block them. So this is like a privacy wall. This is what I call my rock garden. It reminds me of a quiet corner. I spent hours chiseling holes in the rock.

DENTON TARVER: Oh, wait, you made this? With the rock here?

MALE SPEAKER: Yeah.

DENTON TARVER: Well, it seems like you have everything in here. Are you like a garden MacGyver or something like that?

MALE SPEAKER: Kind of.

I work with small spaces as a living. Every time I shopping for plants, I’m shopping for myself. I like to go a lot to vintage shops, garage sales, Salvation Armys. You never know what you can find. And that’s where you find all this interesting stuff. It’s all about keeping it tight and keeping it organized. DENTON TARVER: See you next time, on Urban Gardener. TRACY METRO: Like home and design? Have Facebook, Twitter, Tumblr, and Pinterest? So do we. Want to get some free exclusive content and give-aways? So do we. Subscribe to Spaces right here..

So what do you think? We love tiny gardens and think that every apartment or condo can benefit from them. What are you going to grow in yours?

As found on Youtube

How to Grow Garden Superfoods

Let’s be honest. Superfoods are amazing when it comes to nutrient content, complete proteins, and what they can potentially do for your health. As amazing as superfoods are, they’re incredibly expensive. Just walk down the aisles of any Whole Foods or other health conscious grocery store, and you’ll walk away with a bit of sticker shock. Luckily, it turns out that garden superfoods are pretty easy to grow in your own home. Skip the high prices and learn to grow your own superfood at home.

Plan Your Garden Superfoods Accordingly

Not every superfood is created equally. Blueberries have different soil nutrient requirements than quinoa for instance. While you can probably get away with putting everything in the same bed, we recommend utilizing some of the balcony garden ideas we’ve laid out here to create micro beds that can target specific nutrient needs. Even if you have all the space in the world, sometimes keeping your grow on the small side has extra benefits.

But why go all out right away? Start with the easiest garden superfoods first and work your way up!


Start With Kale

Just start with Kale. It’s one of the easiest to grow, is very hearty in almost all weather conditions and is among the most robust of all vegetable superfoods. Add to the fact that Kale, especially heirloom varieties, is very attractive looking, there’s reason to grow it even if you don’t like the flavor. Do yourself a favor and get some recipes that mask the flavor.

Kale grows quickly, especially in spring and fall. Baby kale leaves can be ready in as little as three weeks. Mature leaves are ready for the largest salads in six to eight weeks. In more temparate climates kale can be grown year round, but even in frosty climates, kale can often be harvested well into the winter months.

Move to Oregano

oregano is one of the easiest garden superfoods to growWho doesn’t love oregano? As an herb, oregano is essentially a weed and grows like one meaning is near impossible to kill without serious, targeted effort. Oregano grows into a tall, wide bush that comes back each and every year, so it’s what’s known as a “garden anchor.” If you want to keep your garden on the small side, oregano, along with most herbs, will grow to accommodate their environment. Plant them in individual containers to keep them small, or in larger pots to have a big bushy oregano plant.

Moreover, oregano is a staple of basically all food Mediterranean. Italian sauces, roasted peppers, hummus and pita are all made more robust with oregano. Oregano also has the benefit of being extremely high in antioxidants.

Most of the rules for oregano apply to other herbs as well. Growing a small herb garden is a great way to get your feet wet in growing garden superfoods.

As found on Youtube

DIY Vertical Herb Garden Planter Box

Gardening at home, growing your own food, is an extremely rewarding and almost spiritual experience. That being said, for the beginner gardener, or the gardener with little space, it can seem like a large, messy, daunting task. That’s why we at Upcycle recommend getting your hands dirty a little bit at a time. One great way to get started with something you’ll actually end up using is an herb garden. How about a vertical herb garden to save space? Relatively simple to grow, since, they’re basically weeds, herbs can be grown in a small space with basically no training. In short, if you can’t get an herb garden going, let’s start with a Chia Pet and move on from there!

The video below demonstrates how to build a DIY vertical herb garden planter. You may not have all of the woodworking skills that this video maker has, but that’s no reason why you can’t use some of the other vertical gardening ideas we’ve been enthusiastic about to create your own easy to grow herb garden. Remember, the first step to success is taking any action, so why not get started with your own vertical herb garden today?


Getting Your Own Hands Dirty

One of my passions in life is woodworking. I think probably because it fulfills that caveman instinct that I have, and a lot of men have, to provide for their families. Often times projects that I take on in the workshop fulfill a need that we have in the house. But there is something else that has quickly become a passion of mine as well. Gardening. And probably for a lot of the same reasons as woodworking. It feels good to be able to put a dinner on the table where most of the ingredients came from here, the backyard. But, like for many people our space for growing food is limited. So recently I have tried to look for ways to get more out of the space that we do have. And I figure, a vertical herb garden would be a good way to do that.

Choose Materials Wisely

When you think of materials for any outdoor project, probably the first thing that comes to mind is cedar. And why not, its rot resistant properties are basil grows like a weed and should be in every vertical herb garden
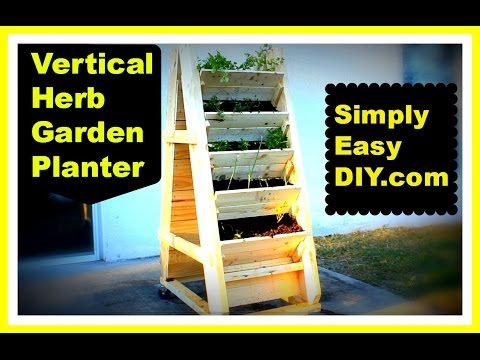
well known. With that said I’ve chosen some scrap pine left over from previous projects. I’ll cut four pieces with a fifteen degree angle for the legs to start. Yes, untreated wood will decompose over time, even cedar. However, wooden planters built out of untreated wood, will probably last a lot longer than you think. I’ll mark out every nine and a half inches or so on both sides of all four legs. I’ll need twenty cleats about five inches each. I off set the marks on each side of the legs by about an inch and a half, to give me the angles that I need for the shelves. I am not using any glue in the planter portion of this project. Over the years as different parts wear out, I want to be able to easily replace pieces of the planter. Now that the legs are done, I need some back slats. For my dimensions I’ll need about 14 board feet.

A Great Weekend Project

rosemary is the perfect addition to any vertical herb gardenI already have one of the planter boxes done. So for the second one I’ll place the sides on top of each other to make sure the widths match after I’m done putting the back slats on. Tack them with brads just to hold them in place. Check for square. Tack the other side. Drill pilot holes Screw them in place. I’m going to flip each box on their sides and place a board across the bottom to mimic the ground so I can get the angle right. Cut some leg braces on the miter saw. Now I thought it would be nice depending on the type of plants we have at the time if we could easily move the vertical herb garden around the patio so I’ll build a frame out of this extra two by six.

After cutting a couple pieces to length, I’ll rip them in half. Cut some half lap joints on the band saw. On a project like this I really don’t measure joints like this, I’ll just eyeball it. As I said I’m not using glue on the planter portion of this build. I’ll use it here because if the base needs replacing I’ll just replace the whole thing. I’ve moved everything to the back patio so I can attach the bottom frame and the casters.

Want to Make it Movable?

These are 3 Inch locking casters. The little guy was so eager to help his dad I had to find him a job. Obviously cedar or some other resistant type of wood would prolong the life of a project like this. I figured the cost of cedar in my area for this would run about $300. This was free for me as all of the material came from the pile of wood I have sitting in the back of my garage. and any replacement parts I may need, well… those will be free as well. Its hard to argue with free. Oh, I did have to buy the casters. Those were three dollars each.

So I guess I spent about twelve dollars on the project. For more information about this project or other diy projects you can go to my website, simply easy diy dot com. Find me on facebook and pinterest. Until then..

As found on Youtube

Conclusion

As I mentioned earlier, there’s no reason that you have to go this in depth when starting your own vertical herb garden. There are plenty of materials around the house or apartment that can be upcycled to fit the need. Think of old storage racks, or new cheap ones from Ikea. That being said, what we love about this project is that you get your hands dirty and its cheap. That’s just a good investment of time and effort.

Container Gardening – Vegetables as Balcony Plants

If you don’t know the joy of growing your own food because you’re short on space, don’t be alarmed. At Upcycle we think everyone should be growing their own food and that it can be done in the smallest of places. Now, you may have tried your hand at putting a few potted balcony plants out on your terrace in your apartment. Chances are that you may have a ficus tree, or a small palm or probably some flowers. I bet you didn’t know that vegetables actually make great balcony plants. They’re just as easy to grow in pots as they are in a sprawling backyard garden. The video below gives some great tips on getting started with container gardening. Welcome to the world of vegetables as balcony plants.

The best thing about growing balcony plants in containers is that you’re not limited to what you can grow based on your location. Use Native Soil to tailor your soil to your specific crops.


Think Outside the Backyard

Container gardening is becoming more and more popular as people appreciate the flexibility and extra growing space it provides. It’s not just about flowers either – you can grow your own tasty produce right outside your door and many specially-adapted plant varieties are now available. But growing in containers does come with its own special challenges and if you want to succeed it’s important to plan ahead. Let us take you through the essentials. Where to site your containers is the first thing you need to consider.

Most vegetable plants like lots of sun, so it’s important to choose a place which will provide 6 hours or more of direct light – south or west facing locations are the best. Placing them as close to your house as you can will mean you have easy access to your plants – great for harvesting and easy for you to take care of them. Choose a sheltered spot for your pots so your plants are kept out of cold, drying winds. Walls, fences & hedges are good locations, or try to screen the pots.

Using your window ledges and balconies is a great way to get started if you don’t have a garden but make sure your pots are properly secured to prevent them from blowing off when the weather gets windy. Watering is the number one priority for containers as the plants won’t have access to moisture below ground. On a hot sunny day they can dry out within hours and plants might not recover from serious wilting. On hot days giving plants a thorough watering in the early morning and evening will be required, making sure that you don’t just wet the surface, but allow it to soak down to the roots. For added convenience, drip irrigation can be installed – particularly useful if you’ll be away from home during part of the summer.

Planning Ahead is Key

Containers come in all shapes, sizes colors and materials. Plastic and wood are tried and tested materials, but you can unleash your creativity. Just make sure they are clean and won’t leach harmful chemicals. Large pots can also be used to grow plants that aren’t native to your area. For example they can be filled with special soil for blueberries, which like acidic conditions. And for heat loving plants such as dwarf citrus trees, containers enable the plans to be moved to a warm conservatory or greenhouse during winter months, protecting them from the worst of the winter weather.

Growing vertically can help fit more balcony plants into a small space.
Photo by HALDANE MARTIN

There are plenty of options available for using vertical space too, and if you have a warm sunny wall which absorbs heat during the day this will radiate the warmth during the night, protecting the plants from cold snaps. It’s essential to provide good drainage. Plants are easily killed if their roots are waterlogged. Make sure there are adequate drainage holes and that they’re free from dirt or blockages Adding a shallow layer of stones or broken pottery to the base of the pot often helps to improve drainage.

The aim is to cover the drainage hole so the soil doesn’t leak out while still providing gaps for excess water to drain through. Fill the container with a purchased potting soil or your own homemade compost. Don’t use soil from your garden, as this is likely to be heavy and to contain weeds and soil-borne pests. Using a lightweight and moisture-retentive mix is the best for containers, and it will need topping up each season to replenish nutrients which have been used up.

Choose the Right Container for Your Balcony Plants

Which container is best to use will depend on what sort of crops you are growing, so let’s take a look at some of the best veggies to grow in containers. It doesn’t get any easier than growing salad leaves. They only need a shallow container a few inches deep. If summers are hot in your location, choose an area that gets morning sunshine and afternoon shade to avoid the plants bolting (running to seed) before they’re ready for harvest. Cut-and-come-again type salad leaves often come in packets with several different varieties, providing an exciting mix of leaves that will only take weeks to grow.

Tomatoes can be grown in several different types of containers, but they’ll need plenty of soil to supply the nutrients they need right up to harvest. Many varieties, such as Tumbling Tom, can be grown in hanging baskets, and look great as they trail towards the floor. Other varieties can be grown in grow bags or soil bags, or you can use large pots at least 10 inches in diameter. Make sure you use a stake and tie the plants to it to keep them upright. Tomatoes are very thirsty so will need lots of water – at least twice a day in hot weather.

Who knew potatoes would make great vegetable plants?
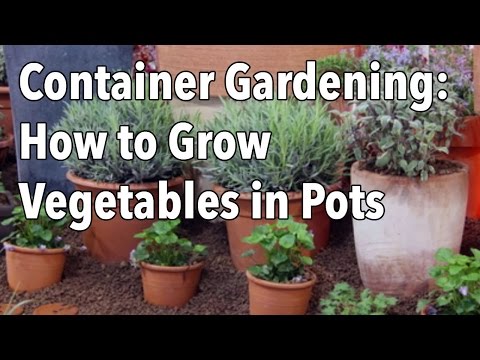
Potatoes can be grown in large pots, or bags and sacks designed specifically for the job. The seed potatoes are layered with potting mix and left in a sunny spot, watering as required. As they grow you can layer more soil around the stem of the shoots. Gradually the soil builds up until the top of the container is reached. Balcony plants can be vegetables, herbs, and edible flowers. Take a look at our extensive Grow Guides for more information. Our Garden Planner has a range of specially designed garden objects to make planning and managing your container gardening easy. With the basic outline of your space, you can then view garden as a whole.

Mix and Match to Suit your Tastes and Your Crops

As you add the different containers that you’ll use to your plan make sure you leave enough space so you can water and harvest your balcony plants. The Parts List will provide a useful summary of all the containers and other objects, such as drip irrigation, for the plan. Adding plants is as simple as clicking to place them in the relevant containers with the colored area around each plant indicating how much soil space the roots require.

For example, we can easily see how many tomatoes will fit into this grow bag and hanging baskets. Add potatoes into the potato sacks, and choose which salad leaves to include in the grow frame. The Plant List then shows you a complete summary of what you were growing including when to plant seeds indoors and outdoors, and when you can expect the harvest, specific to your location. Twice a month you’ll also receive email reminders so you know what jobs need doing and when. Gardening in containers is an easy way of growing your own and you can expand with more containers to fill the space you have.

Whether you have one simple pot for herbs, or a mini farm full of plants, its easy to get hooked on the taste of growing your own fresh produce and the convenience of having it right outside your back door.

As found on Youtube

For 8 great ideas and step by step guides check out Gardening for Beginners by Rebecca Moses!

Vertical Gardening – Simple Ideas for a Balcony Garden

Grow a Ton of Food in a Tiny Space with a Balcony Garden

At Upcycle we really enjoy growing food with Native Soil. One of the concerns we hear most often is that many people don’t have enough space for a big home garden. It is a problem especially among the young, or those living in cities where tiny apartments and condos are the norm. That’s where the concept of balcony gardens, or vertical gardening comes in handy. With a balcony garden anyone can take a tiny amount of space and create huge amounts of food.

All it takes is a little planning to know what to build, what to buy and what plants to grow to make the most out of your balcony garden. The video below does a great job illustrating some easy tips to grow more in a balcony garden.


When space is at a premium and you’ve got nowhere left to grow there’s only one solution – reach for the skies! Given the combination of the right crops, vertical supports, and wall-hugging planters you can pack a lot more into the space you have available. In this video we look at how to plan a vertical vegetable garden so you can get the most from your plot. Climbing plants offer a logical way to begin growing skywards. Suitable vegetables include pole (or climbing) beans, climbing peas, sweet potatoes, vining tomatoes plus sprawling types of zucchini, cucumber, melon and squash that can be trained up supports. Allow plants to find their own way up supports or tie them in at intervals to encourage them upwards.

Many structures can offer support for skyward plants. From simple rows of bamboo canes to more complex or decorative structures. Arbors and arches look complete with climbers such as passionfruit or a grapevine, or how about climbing squashes or beans with colored pods or fruits. The pods or fruits will then dangle down to create a feature that’s both delicious and attractive.

Upcycle Old Furniture to Create Growing Lanes

Wicker or bamboo wigwams offer a space-saving and arguably more attractive alternative to the usual rows of canes, while obelisks and pergolas present decorative solutions to growing upwards. Our Garden Planner features many support options that can be selected and dropped into your garden plan. Many tree fruits can be trained into a vertical plane, either against a wall or fence, or along freestanding wire supports. Apples, pears and cherries are just a few examples.

These trees may be trained to produce single-stem cordons, fan shapes, parallel-branched espaliers, or other fence-hugging forms. Use sturdy horizontal wires strained between fence posts to create the necessary supports for wall-trained fruit. Cane fruits, such as raspberries and blackberries, naturally grow tall. Left unsupported, the canes have a habit of flopping over to smother neighboring crops. Parallel wires secured between upright posts will keep them in line. Our Garden Planner has a range of space-efficient plants to choose from – for example, this apple cordon. The Planner also helps you to select and place supporting structures. Take these pole beans for example – they need some bamboo canes to climb up.

Use Many Little Niches to Maximize Growth

Reusing materials from home reduce the cost of your balcony garden
Photo by girlingearstudio

Make you garden work harder for you by including any number of wall-mounted or stepped planters, planting pockets, tower planters and hanging baskets. Fill them with herbs, salads and strawberries, then watch a blank space take on a whole new life. The Garden Planner has lots of ideas for suitable containers. Simply click the Information button for a description of each and its suitability for your garden. Recycled food tins make great wall mounted planters.

Old pallets are widely available, and turning them into vertical planters is a great way to reuse them. Check they are safe for re-use by looking for the pallet stamp. It will have stamps displaying the IPPC logo and/or the letters EPAL, plus HT or DB. Hammer or hang your recycled containers into position before filling with potting soil.

Don’t Forget to Water, or Better, Automate!

Wall-mounted planters are likely to require regular watering because of the rain shadow cast by the wall. Micro or drip irrigation systems deliver water efficiently. Automate water delivery by coupling irrigation with a cheap timer. Walls or fences must be strong enough to hold the considerable weight of damp potting soil. In most climates you will also want to make the most of sunshine but picking a surface that faces the mid-day or afternoon sun. Reflected heat from the day speeds growth time and shortens harvest time. It’s the right combination of vertical- growing crops, supports, and the correct containers that will help you to get the most from a small space.

Of course, there are plenty of other ideas out there for vertical vegetable gardens. If you’ve got one, don’t keep it to yourself – share it by dropping us a comment below. And with seed sowing beginning in earnest, now is the ideal time to subscribe to enjoy more great gardening videos.

As found on Youtube

10 Superfoods That Will Save Your Life

What are so called “Superfoods?”

Superfoods are nutrient dense, almost magically so, foods that have so many health benefits, they take on a mystical status. Not all superfoods are created equal. Some are grains, berries, nuts, or fish. So while you can’t grow all of your own superfoods, there are plenty that you can get right out of your own soil.

This curly lettuce may not seem like much, but its health boosting aspects have earned it a place on our Superfood list. Kale regulates the body’s pH level which leads to overall improved health and well-being. It also helps absorption, regulates value, and can even thwart disease due to its immune boost and anti-inflammatory assets. As a vegetable rich in the essential phytonutrients, it protects against a wide array of cancers, with studies showing its ability to help the liver raise cancer-fighting enzymes. A rich source of potassium and phytonutrients a humble container of yogurt contains all sorts of superhuman health benefits. Oats have a special type of fiber that helps to lower cholesterol and thwart heart disease. Since oats also contain magnesium, which works to regulate blood sugar levels, studies suggests that munching whole oats may reduce the risk of type 2 diabetes.


Grow Your Own Superfoods

Tomatoes – the delicious red-faced vegetable which isn’t actually a veggie. Yet, did you know that its red-faced shade comes from lycopene, a strong antioxidant rarely found in other fruits. Studies have found that this fantastic nutrient could protect the skin against dangerous UV lights, slowing the development of certain types of cancers. If that isn’t enough, tomatoes also help to lower cholesterol. Astonishingly, the most difficult health help comes from tomatoes which have been cooked, as the heating process increases the amount of lycopene our bodies are able to absorb. Kefir, the centuries-old fermented milk product, makes “good feeling” in Turkish offering a clue as to why it has compiled this top 10 inventory.

Containing high levels of vitamin B12, calcium magnesium, vitamin K2, biotin, folic battery-acid, enzymes and probiotics, kefir indeed is a SUPER food. Acclaimed as mending digestion-related illness and cankers including IBS and Crohn’s disease this sour tasting and elixir even cures those suffering with lactose intolerance.

Broccoli is a superfood much hated by kids everywhere. This tree like lettuce is actually one of the greatest Superfoods.

The humble Avacado, one of nature's greatest superfoods
Photo by DesultoryMe

An enormous source of vitamin C and folic acid, it also contains vitamins A and K, as well as calcium fiber, beta-carotene and many other antioxidants. All of this means that broccoli boosts the immune system, lowers the incidence of cataracts, encourages cardiovascular health, and builds bones.

Superfoods May Help in the Fight Against Cancer

What is more, in 1992 a researcher at John Hopkins University announced the detection of a combination found in broccoli that not only slowed growth by 60%. They found further shrinking of the pre-existing tumors by 75%. Another lettuce meditate is the avocado.

A few of its little healthy properties. It contains all 18 essential amino acids, omega 3, vitamins B-complex, C, E and K. Avocados also contain fiber necessary to bunker excess cholesterol and remove it from the body. Avocado is also an good sidekick, helping us to suck essential nutrients when eaten in conjunction with other Superfoods.

The humble avacado’s Superfood status spreads further when studies noted that a lipid in avocados, may be helping to fight leukemia.

How about Some Small Superfoods

All berries are full of cancer-fighting phytonutrients. Famous is the blueberry; nonetheless, pitch-black raspberries are worthy of more consideration. Containing the highest concentrations of certain phytochemicals these juicy shields help to slow the expansion of pre-cancerous cells and stop brand-new blood vessels from assembling which would potentially feed a cancerous tumor.

Several large studies have found that those who ingested more garlic are less likely to develop various kinds of cancer.  Especially cancers relating to digestive organs such as the esophagus, belly and colon.

This is because the nutrients found in these fragrant bulbs help to prevent cancerous elements in your body from forming. For this superfood to really sing, you have to eat it fresh. So warn your neighbors. A member of the ginger family, turmeric can be used for much more than merely flavoring curries. This orange-colored spice has been identified by the American Cancer Society as containing curcumin. Curcumin is an incredible ingredient capable of stopping specific types of cancer cells from growing, and even shrinking pre-existing tumors.

Don’t Forget the Grains

brown rice photo
Photo by Arria Belli

Brown rice is known for being healthier than white, but black rice, its darker cousin is far superior. Known as “Forbidden Rice” in Ancient China when it was only eaten by royals, pitch-black rice differ from other rice as it has the highest iron and zinc content. As with black raspberries and other vibrant colored foods, pitch-black rice contains more antioxidants than lighter colored grains. Black rice is rich in anthocyanins which are accredited as preventing DNA damage that can cause cancer. So, looks like there should always be a few colors on the plate.

Want to learn more about growing your own superfoods at home? Sign up for our email updates in the box below!

[rainmaker_form id=”530″]


What Do You Require in Life?

“If you have a garden and a library, you have everything you need.” – Marcus Tullius Cicero

Seems simple enough right? Sometimes life can become too complicated, so over complex that it becomes necessary to pare down to the basics. A garden and a good book. We can get on board with that sentiment. Sage wisdom from the ages.

cicerogarden

Why We Should Be Urban Farming

If you’ve heard us say it once, you’ve heard us say it a thousand times. At Upcycle, we believe in producing locally. While we have created Native Soil, in part, to help individuals create their own healthy food in their own homes using locally sourced material, deep down, we  know this idea is good for the world. Urban Farming is the idea that we can use unused land, roof tops, front yards, balconies, and generally just about any underutilized space to be creating food for inhabitants that isn’t traveling thousands of miles before it reaches the dinner table.

How Native Soil Helps Urban Farming

And that’s where Native Soil comes in. As we know, urban soil is, by in large, terrible. Traffic, aircraft, municipal runoff, pavement, and overdevelopment, just to name a few, have robbed the urban landscape of the necessary nutrients to produce healthy food. At Upcycle, we use locally sourced waste to revitalize that barren soil and make it nutrient rich, so that urban farming can be a locally sourced reality.

We believe that its just the right way to tackle this problem. And, being the nerds we are, we think that PBS has done a great job outlining the importance of urban farming and the techniques that can really make urban farming a viable option for the 21st century and beyond.


A Population Explosion Requires Urban Farming

All the cities of the world contain over half of the population of this world. And do you know how much land that requires to feed that half of that? Half of South America. Half of South America. That’s how much land, when you add it all up the around the world, that’s how much land is put together to feed the cities. OK, so that means the amount of land needed to grow food for the entire world is about the size of South America. Right. And that’s just for crops. The amount of land used for livestock is actually way more than that, about the size of Africa. And the global population is supposed to hit 9 billion in the next 40 years. And that means we’re just going to have to keep using up more and more land. Yep. And keep in mind that 57% of Earth’s land is uninhabitable. And about 3% is developed urban areas.

So we hit 9 billion. That’s a 25% increase. And if we continue to grow our food in the same way– We’re going to run out of space real fast.

Even in a sprawling metropolis like San Diego, urban farming can help reduce the need for population to source food from so far away. Even when food is sourced, what happens to it?

And roughly one third of the food we do produce is wasted. [BLEEP] What would you say is the future of food? Well, the future of food is recognizing what Malthus knew years ago. We eventually are going to run into a food problem. I think we’re already there. So we’re going to have to use possibly future discovered techniques, but definitely we have to use all of the techniques that have worked wonderful for centuries. This is Ken Dunn, president of the Resource Center and founder of City Farm, where they’re reclaiming vacant lots in Chicago and turning them into farms. In the Amazon they learned thousands of years ago to put food waste back on poor soil, and you’ve got rich soil. That’s what we do here. We seal the vacant lot, which has contamination from this being an industrial city. And we put food waste compost two feet deep.

How Much Food Is Wasted Now?

Ken Dunn and the fine people at City Farm create this compost by picking up discarded food from grocery stores and restaurants and other places around the city.

How much food waste is in here? Well, this bin has two ton now. Its capacity is three ton. Giant pile of packaged bagels and gallons of milk. This is just one small example of the waste that happened, what, yesterday? Yeah. And so I get two of these truckloads every day.  I have a bigger truck that can haul 15 tons at a load. We get several truckloads of that every week. So you’re going to compost this and use it to enrich the soil. Yeah. Yeah. This is just a fraction of the food waste that happens every day. Grocery stores and food suppliers will often throw out fruits and vegetables that they don’t think can sell based on appearance or quality, even though they might still be edible.

Or in this case, two tons of bagels and milk that were over-purchased by a convention center, and this weird bag of egg and cheese mix thing.

Let’s Take it Back to the Way We Used to Grow

spoiled food photo
Photo by stevendepolo

We’ve lost a lot of preservation techniques that people used to know. You know, everybody used to know instinctively how to can things, how to make cheese, etc. And because we’ve given up access to our food system, we’ve lost a lot of those skills. CRAIG: This is David Durstewitz, sales manager at City Farm. So either that needs to be done, you know, more completely on an industrial level, or the more stable solution is just return to a local food system that’s more interconnected. CRAIG: And our food’s often shipped long distances reducing freshness by days and using more fossil fuels. And bringing the farm into the city eliminates those problems. Agriculture is, of course, one of the oldest professions. But it’s not simple. A lot of farming is subsistence, or even losing it. You put in so much labor, you can barely eke out a living. But if you have very rich soil, that tips it in favor of supporting a family and producing good food.

Poor Soil Makes Poor Food

It takes the same amount of time to plant and harvest a tomato in poor soil as it does in good soil.

In poor soil, you get a one-pound tomato. In great soil, rich with compost, you get a two-pound tomato. And its flavor, and thus its nutrition, is excellent. What about the climate? Isn’t a city too dirty to grow crops in? The climate of a city can be beneficial for growing, and it can also be detrimental. Generally, a city is hotter than the surrounding areas.

And so in a northern city that really helps. In Louisiana that might not help. What makes a city hotter? Pollution. CRAIG: Pollution. Well, yeah. Pollution. And just the amount of energy that’s being expended here and then giving off heat. CRAIG: So you’re saying the heat that comes from waste and pollution is useful for growing food. I am saying that, yeah. CRAIG: Well, that’s cool. I’m not advocating– CRAIG: No, I know. Huh. That’s interesting. But realistically, though, how many vacant lots could there be in a developed city like Chicago? The city has mentioned they have 12,000 vacant acres. And they would like them cleaned up, as we have here, and producing jobs with the local neighborhood. But we need to just keep the priorities that a resource should as much as possible be an asset to the local community.

Growing the Right Food or the Wrong Food?

90% of the farms in the United States produce commodity crops that are then converted into processed foods.

And that’s not how to best utilize our space for growing for human health. We need a production system that has as its goal the health of a local community. So local control of a food system is absolutely something that we’ve lost and that we need to regain as quickly as we can for a lot of different reasons. More than one-third of adults and 17% of children in the United States suffer from obesity, while at the same time, 49 million Americans live in food insecure households, either going hungry or lacking proper nutrition.

So at the same time we’re eating too much food, but not enough good food. Right. And part of the solution might be to grow more nutritious food locally to benefit the surrounding community. The resources in the devastated communities of Chicago, a lot of vacant land, a lot of unemployed people, and then a lot of waste.

Where Products Like Native Soil Come In

What if we ingeniously enriched that vacant land with waste wood products, waste food products, and had a rich farm, employed local people to produce the healthy foods that community needs.

[In our case at Upcycle we are using waste from the booming local beer brewing industry, but the concept applies across the board in urban farming. San Diego’s unique waste happens to be beer, but that’s not the case in every city around the world. Urban farming requires a certain level of unique application to apply the local waste as the solution to its own problem!]

Let’s find ways of exploiting the value in a neighborhood for that neighborhood. So this is our model. So maybe if we stop wasting a third of our food to feed those 9 billion people in 2050.

Yeah. Maybe if we start focusing on maximizing our nutrition rather than maximizing our calories we won’t need land the size of South America and Africa for food.

The world is changing fast. If we’re going to keep up with the pace of the changes around us, we’re also going to have to change the way we produce food. MATT: We’re going to have to employ new farming techniques and return to some of the older ones. CRAIG: Maybe we could build up instead of wide, focus more on quality over quantity, keep things local and fresh, maybe even a little lower on the food chain. MATT: There’s not going to be an easy silver bullet solution for upcoming food problems. Every place is different, with their own unique food challenges.

CRAIG: But there’s plenty of improvements that can be made.

Tailoring the SOILution for Urban Farming

And there’s plenty that we can do to help. Living in Chicago, and obviously being surrounded by so many high-rises, I think it’s important to be connected to nature, because it’s something that’s important to me. Are you going to teach me how to plant things? Yeah, we’re going to teach you a few things today. OK. Let’s do it. What’s more important than growing food? Nothing. Nothing’s more important than growing food.

CRAIG: Food is something that a lot of us take for granted. Most of us have only a vague idea of where it comes from or how it’s produced. But our very well-being depends on a healthy, sustainable, and plentiful food supply. So we shouldn’t let it go to waste, because the future of food is the future of us. And done. I farmed.

See ya. So I’m quite hopeful that we will make progress, and civility will return to the planet. So that’s the end of the Future of Food playlist, but hopefully not the end of the future of food. Am I right? Got to fill that belly. Thanks for watching and for all your great comments and questions. If you guys like the show, and you want to help us continue making the show, consider becoming a supporter of patreon, right up there. And we’re always looking for people to help promote the show. So if that sounds like something you’d like to do, sign up for our digital street team.

And if you’re interested in learning more or helping out Ken Dunn in the Resource Center, you can go to resourcecenterchicago.org.

Great Food and Food Waste Reduction go Hand in Hand

I have some exciting upcoming projects to help combat food waste. You should keep a lookout. OK, last week we asked you guys if you thought vertical farms were the future of agriculture. This is what you had to say. Well, they didn’t actually say anything. They typed. Well, they said it with their fingers. You know when you talk, you know, finger talk, into the computer. No, it’s typing, it’s different. Jack Linton so astutely pointed out that mushroom protein can be grown in an urban environment and not use a lot of resources. And they produce CO2, which can be cycled into plant rooms. And Benjamin Shaw thoroughly explained the process of aquaponics, which is basically incorporating fish into the hydroponic plants growth cycle.

Funny story, we already talked about that when we went to a place called The Plant in Chicago, where they do just that. You should check it out. It’s in our Recycling playlist, linked in the doodly-doo. Tyler Cooper, Stephen Gubkin, and a number of you pointed out that vertical farms require a lot of energy and big upfront costs.

It’s true that electric grow-lights cost money and fossil fuels. But by using energy-efficient LEDs, vertical farms can minimize the amount of energy used. A lot of indoor farms use inefficient grow lights that use a lot of electricity and create a lot of heat that were require power-hungry air conditioning units to keep the plants cool.

urban garden photoLEDs give out very little heat, which means you can have them closer to the plants, you don’t have to pay as much to cool them, and you can have more vertical rows closer together. Also, LEDs can be up to 75% more energy-efficient than conventional fluorescent bulbs. Still comes out to a lot of energy usage compared to sunlight, which is free. But these energy costs could be offset by using renewable energy sources, like the anaerobic digester they have at The Plant, linked in the doodly-doo.

And as the technology improves over time, you’d expect the energy efficiency to increase as well.

Paul Cristo asked if Green Sense Farms was actually profitable. How much do you make, Paul Cristo? Huh? Huh? None of your business. Well, we weren’t able to get specific numbers. So I guess time will tell. But there’s definitely been a trend in new vertical farms investment and construction, which could be an indication that it’s working.

Vertical Farming and the Urban Farming Revolution

The world’s largest vertical farm is currently being built in Newark, New Jersey. When it’s done, it will grow up to 2 million pounds of kale, arugula, and Romaine lettuce per year. Got to get that Jersey green! Thanks again for all your great comments and questions. We’ll see you guys next week for the first part of our Thrill Seeking playlist. Pretty excited. Thrilling. What’s going to happen? Who knows? Well, we do. We know. We’ve already shot it.

With so many people living in such tight quarters, is urban farming the real solution to they myriad of associated problems? Yeah, we think it is. Urban farming uses locally sourced materials to create food locally, thus reducing the double whammy of waste of creation and the waste of transportation. With a little work and a with products like Native Soil, we really do believe that our food can be created locally, even in harsh urban environments through sound urban gardening practices like those outlined in the piece.

We’re in for quite a ride here friends.

The Amazing Health Benefits of Superfood Kale Grown with Native Soil

What is the Superfood Kale?

One of our favorite plants to grow with Native Soil in San Diego is the superfood kale.

Kale has some amazing health benefits and is relatively easy to grow in most of the San Diego microclimates year round. Now, while we’re crazy about digging in the dirt, science and manufacturing, I’m not going to pretend that we are the best fitness experts. So here is Mitch from Fitness Radar to tell us about just a few of the health benefits of the superfood kale.

And remember, if you’re in San Diego and want to get seriously health crazy? Try mixing a superfood kale and local seaweed salad. Come to think of it I know what’s going on the plate tonight. Nothing says a warm holiday like a little superfood.


Health Benefits of Kale

Did you know that Kale is probably the king of all greens? Kale is loaded with Vitamins such as B6, Vitamin a, c, k manganese, calcium, copper, potassium magnesium iron..I could go on for days it’s like a living breathing vitamin store lol This green leafy vegetable sometimes comes in purple can have a smooth or curly appearance is a part of the cabbage family. and is related to broccoli collard greens and Brussels sprouts they must have very steamy family reunions lol! Kale contains very little fat is low in calories and has a bitter taste when eaten raw. (Don’t worry, you get used to it. We did!)

Doesn't superfood kale look delicious?
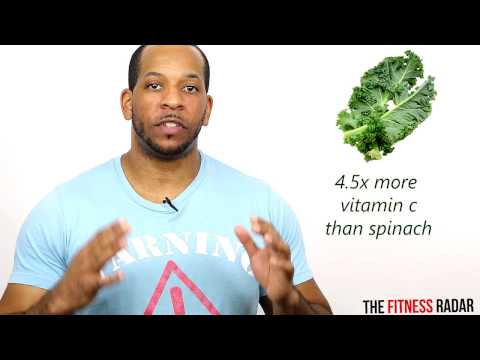
The benefits of kale are high in antioxidants Lowers cholesterol helps eyesight is 4 and a half times the amount of vitamin c than in spinach and A single cup of raw kale actually contains more vitamin C than an orange. There are many ways to eat kale You can sauté it or add it to salads you can bake it with some and salt for some kale chips and you can definitely add it to a smoothie so it is very versatile Click the card up here or the link in the description for the playlist of all of the other fruits, vegetables, and vitamins that we are going to be covering.

Don’t forget to subscribe then hit the bell next to it to receive updates when we post new videos. Until next time, stay focused stay fit please hit the like button show your support. I’m Meech with the Fitness Radar salute! .

Want to learn more about how to grow superfood like kale in your own home using Native Soil? Sign up below for more tips, tricks and discounts!

[rainmaker_form id=”530″]