
Gardening at home, growing your own food, is an extremely rewarding and almost spiritual experience. That being said, for the beginner gardener, or the gardener with little space, it can seem like a large, messy, daunting task. That’s why we at Upcycle recommend getting your hands dirty a little bit at a time. One great way to get started with something you’ll actually end up using is an herb garden. How about a vertical herb garden to save space? Relatively simple to grow, since, they’re basically weeds, herbs can be grown in a small space with basically no training. In short, if you can’t get an herb garden going, let’s start with a Chia Pet and move on from there!
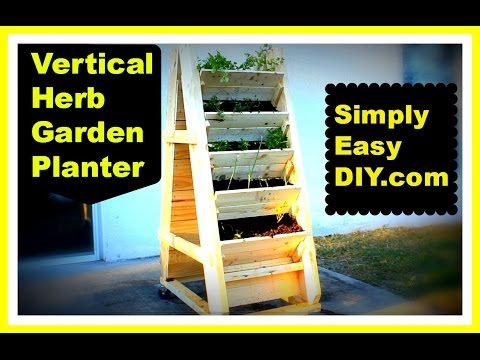
The video below demonstrates how to build a DIY vertical herb garden planter. You may not have all of the woodworking skills that this video maker has, but that’s no reason why you can’t use some of the other vertical gardening ideas we’ve been enthusiastic about to create your own easy to grow herb garden. Remember, the first step to success is taking any action, so why not get started with your own vertical herb garden today?
Getting Your Own Hands Dirty
One of my passions in life is woodworking. I think probably because it fulfills that caveman instinct that I have, and a lot of men have, to provide for their families. Often times projects that I take on in the workshop fulfill a need that we have in the house. But there is something else that has quickly become a passion of mine as well. Gardening. And probably for a lot of the same reasons as woodworking. It feels good to be able to put a dinner on the table where most of the ingredients came from here, the backyard. But, like for many people our space for growing food is limited. So recently I have tried to look for ways to get more out of the space that we do have. And I figure, a vertical herb garden would be a good way to do that.
Choose Materials Wisely
When you think of materials for any outdoor project, probably the first thing that comes to mind is cedar. And why not, its rot resistant properties are  well known. With that said I’ve chosen some scrap pine left over from previous projects. I’ll cut four pieces with a fifteen degree angle for the legs to start. Yes, untreated wood will decompose over time, even cedar. However, wooden planters built out of untreated wood, will probably last a lot longer than you think. I’ll mark out every nine and a half inches or so on both sides of all four legs. I’ll need twenty cleats about five inches each. I off set the marks on each side of the legs by about an inch and a half, to give me the angles that I need for the shelves. I am not using any glue in the planter portion of this project. Over the years as different parts wear out, I want to be able to easily replace pieces of the planter. Now that the legs are done, I need some back slats. For my dimensions I’ll need about 14 board feet.
A Great Weekend Project
 I already have one of the planter boxes done. So for the second one I’ll place the sides on top of each other to make sure the widths match after I’m done putting the back slats on. Tack them with brads just to hold them in place. Check for square. Tack the other side. Drill pilot holes Screw them in place. I’m going to flip each box on their sides and place a board across the bottom to mimic the ground so I can get the angle right. Cut some leg braces on the miter saw. Now I thought it would be nice depending on the type of plants we have at the time if we could easily move the vertical herb garden around the patio so I’ll build a frame out of this extra two by six.
After cutting a couple pieces to length, I’ll rip them in half. Cut some half lap joints on the band saw. On a project like this I really don’t measure joints like this, I’ll just eyeball it. As I said I’m not using glue on the planter portion of this build. I’ll use it here because if the base needs replacing I’ll just replace the whole thing. I’ve moved everything to the back patio so I can attach the bottom frame and the casters.
Want to Make it Movable?
These are 3 Inch locking casters. The little guy was so eager to help his dad I had to find him a job. Obviously cedar or some other resistant type of wood would prolong the life of a project like this. I figured the cost of cedar in my area for this would run about $300. This was free for me as all of the material came from the pile of wood I have sitting in the back of my garage. and any replacement parts I may need, well… those will be free as well. Its hard to argue with free. Oh, I did have to buy the casters. Those were three dollars each.
So I guess I spent about twelve dollars on the project. For more information about this project or other diy projects you can go to my website, simply easy diy dot com. Find me on facebook and pinterest. Until then..
As found on Youtube
Conclusion
As I mentioned earlier, there’s no reason that you have to go this in depth when starting your own vertical herb garden. There are plenty of materials around the house or apartment that can be upcycled to fit the need. Think of old storage racks, or new cheap ones from Ikea. That being said, what we love about this project is that you get your hands dirty and its cheap. That’s just a good investment of time and effort.